How to Create a Custom Dojo Tab in the Contributor UI
By: Mike Field October 11, 2017


Introduction
When you’re customizing the Contributor UI, sometimes you want to open a new tab with custom contents. For example, say you want to open a new tab that shows a custom list of assets, or a tab that displays a screen from a third-party application. To do this, you need to create two new Dojo classes (a custom “document” and “view”) and configure them in WebCenter Sites' SiteConfigHtml element. This blog post presents the steps and code samples required to accomplish this.
WCS Version
These steps work on Oracle WebCenter Sites 12c. (They will also likely work on 11g, but the exact code samples below haven't been tested on 11g.)
Overview of the Steps
To open a new Dojo tab in the Contributor UI, you must carry out the following steps:
- Create new “document” and “view” Javascript files on the webserver
- Override the SiteConfigHtml element
- Create a CS Element called GenericDispatcher
- Add your code that triggers opening the new tab
1. Creating a New Dojo Document and View
Tabs in the Contributor UI are controlled by the Dojo implementation. If we want to create our own tab with our own element, we have to define a new Dojo document & view called GenericDocument and GenericView by deploying two new Javascript files to the webserver. (We could name them whatever we want, but the prefix “Generic” seems appropriate for our code since it will be reusable.)
Create a new file on the webserver in <web-server-root>/js/fw/ui/document/GenericDocument.js and copy in the following code:
if (!dojo._hasResource["fw.ui.document.GenericDocument"]) {

    dojo._hasResource["fw.ui.document.GenericDocument"] = true;

    dojo.provide("fw.ui.document.GenericDocument");

    dojo.require("fw.ui.document.AssetDocument");

    dojo.declare("fw.ui.document.GenericDocument", fw.ui.document.AssetDocument, {

        load: function(_1) {

            _1 = _1 || this.get("id");

            if (!_1 || !(_1 instanceof fw.ui.document.DocumentId)) {

                throw new Error("Unable to load document: no valid identifier provided");

            }

            var _2 = this.getAssetId(_1),

                _3 = this.assetService.getAssetMetadata(_2),

                _4 = this;

            return _3.then(function(_5) {

                var _6 = _4.assetManager.getAsset(_5[0], true);

                _4.set("asset", _6);

                _4.set("id", _1);

                _4.set("name", _6.name);

                _4.set("bookmarked", _6.bookmarked);

                _4.versioningStatus = _6.lockStatus;

                _4.set("sharable", _6.permissions && _6.permissions.canShare);

                _4.set("supportedType", _6.supportedType);

                _4.set("tracked", _6.tracked);

                _4.set("tname", _6.tname);

                _4.set("subtype", _6.subtype);

                _4.set("type", _6.type);

                _4.set("externalid", _6.externalid);

                var _7 = _4.appContext.getConfig("previewableTypes"),

                    _8 = dojo.indexOf(_7, _6.type) !== -1;

                _4.set("previewable", _8);

                return _4;

            });


        },

        copy: function() {

            throw new Error("This operation is not supported on this asset");

        },

        translate: function() {

            throw new Error("This operation is not supported on this asset");

        },

        checkout: function() {

            throw new Error("This operation is not supported on this asset");

        },

        undoCheckout: function() {

            throw new Error("This operation is not supported on this asset");

        },

        edit: function() {

            throw new Error("This operation is not supported on this asset");

        },

        getDefaultViewType: function() {

            var _9, _a = this.getConfig("defaultView"),

                _b, _c = "genericdoc",

                _d = this.get("asset");

            if (!_a) {

                console.warn("Missing 'defaultView' property in configuration. Using default Custom asset view");

                _9 = "genericdocview";

            } else {

                if (!_d || !_d.type) {

                    _9 = _a[_c];

                } else {

                    _b = _d.type;

                    if (!_9) {

                        _9 = _a[_b] || _a[_c];

                    }

                }

            }

            return _9;

        }

    });

}
Create a second new file on the webserver in <web-server-root>/js/fw/ui/view/advance/GenericView.js and copy in the following code:
/*

 * Copyright (c) 2011 FatWire Corporation. All Rights Reserved.

 * Title, ownership rights, and intellectual property rights in and

 * to this software remain with FatWire Corporation. This  software

 * is protected by international copyright laws and treaties, and

 * may be protected by other law.  Violation of copyright laws may

 * result in civil liability and criminal penalties.

 */

if (!dojo._hasResource["fw.ui.view.advanced.GenericView"]) {

    dojo._hasResource["fw.ui.view.advanced.GenericView"] = true;

    dojo.provide("fw.ui.view.advanced.GenericView");

    dojo.require("fw.ui.view.AdvancedView");

    dojo.require("fw.ui.view.TabbedViewMixin");

    dojo.require("fw.ui.controller.BaseDocController");

    dojo.declare("fw.ui.view.advanced.StatusView", [fw.ui.controller.BaseDocController, fw.ui.view.AdvancedView, fw.ui.view.TabbedViewMixin], {

        getAdvancedURLParams: function() {

            var _1 = this.model.get("asset"),

                _2;

            if (_1) {

                _2 = {

                    ThisPage: "StatusDetailsFront",

                    AssetType: _1.type,

                    id: _1.id

                };

            } else {

                throw new Error(fw.util.getString("UI/UC1/JS/CannotRenderView"));

            }

            return _2;

        },

        show: function() {

            this.set("title", this.model.get("name"));

            return this.inherited(arguments);

        }

    });

}
2. Override SiteConfigHtml
Create a new element called CustomElements/UI/Config/SiteConfigHtml. Make it a JSP element. In it, we will do three things:
a. Define openCustomDojoTab() javascript method
b. Override getAdvancedUrlParams() Dojo (javascript) method
c. Define a new type of Dojo document & view called GenericDocument and GenericView
Paste the following code into the new element:
<%@ taglib prefix="cs" uri="futuretense_cs/ftcs1_0.tld"

%><%@ taglib prefix="ics" uri="futuretense_cs/ics.tld"

%><cs:ftcs>

// Open a new tab containing the Custom Tab contents

// First check if it's already open - if so, focus on it

function openCustomDojoTab( tabtitle, nextelement ) {

var alreadyOpen = false;

var alltabs = SitesApp.tabController.tabContainer.getChildren();

for ( var i=0; i<alltabs.length; i++ ) {

if ( alltabs[i].title == tabtitle ) {

alreadyOpen = true;

SitesApp.tabController.tabContainer.selectChild( alltabs[i] );

break;

}

}

if ( !alreadyOpen ) {

SitesApp.event("document",

"new",

{ "document-type": "genericdoc",

"asset": {

"type": "",

"subtype": "",

"id": ""

},

"name": tabtitle,

"nextelement": nextelement

}

);

}

}


// By declaring a dojo class here, we can override any of its functions

// Here, we override the getAdvancedURLParams of the custom

// class called GenericView

// To create a custom class, simply add two javascript files in the webapp folder

// for example, the custom classes will be "GenericDocument" and "GenericView",

// so the corresponding javascript files will need to be:

//  /sites/js/fw/ui/document/GenericDocument.js

// /sites/js/fw/ui/view/advanced/GenericView.js

dojo.declare('fw.ui.view.advanced.GenericView', [fw.ui.controller.BaseDocController, fw.ui.view.AdvancedView, fw.ui.view.TabbedViewMixin], {

        // summary:

        // A view class for Custom Advanced UI screen

        // overrides the getter for the 'viewArgs' attribute

        // the base class (AdvancedView) relies on the args property to build the correct

        // URL to the Advanced UI framework.

        // Customize as required.


        // The main goal of this override is

        // to set displayelement to the value

        // set in the "nextelement" var

        getAdvancedURLParams: function () {

                var asset = this.model.get('asset'), viewArgs;

                var view = SitesApp.getActiveView();

                if (view && asset && elementname) {

                        viewArgs = {

                                ThisPage: "GenericDispatcher",

                                c: asset.type,

                                cid: asset.id,

                                displayelement: this.model.get('nextelement')

                        };

                } else {

                        throw new Error(fw.util.getString("UI/UC1/JS/CannotRenderView"));

                }

                return viewArgs;

        }


});


// Finally, we need to define our new document and view within

// the configuration namespace

webcenter.sites['${param.namespace}'] = function (config) {

config.defaultView = {

"default": "form",

"genericdoc": "genericdocview"

};

config.views['genericview'] = {

'viewClass': "fw.ui.view.advanced.GenericView"

    }

config.documents["genericdoc"] = "fw.ui.document.GenericDocument";

config.views["genericdocview"] = {

"viewClass": "fw.ui.view.advanced.GenericView"

}

config.toolbars["genericdocview"] = {

"default": [],

}

}

</cs:ftcs>
3. Create GenericDispatcher
You probably noticed in the previous step when we define getAdvancedURLParams(), we set the argument ThisPage: “GenericDispatcher”. The value of ThisPage is the name of an element starting with OpenMarket/Xcelerate/Actions/. This prefix is hardcoded into the Dojo implementation, so that means we need an element named OpenMarket/Xcelerate/Actions/GenericDispatcher. This is the element called when we open a tab using our new GenericView code.
We could choose simply to put all our code directly in GenericDispatcher; but instead, we’re going to use GenericDispatcher to “dispatch” to the element specified in the “displayelement” argument. Do this in the following way:
Create a new CS Element called OpenMarket/Xcelerate/Actions/GenericDispatcher and copy in the following code:
<%@ taglib prefix="cs" uri="futuretense_cs/ftcs1_0.tld"

%><%@ taglib prefix="asset" uri="futuretense_cs/asset.tld"

%><%@ taglib prefix="assetset" uri="futuretense_cs/assetset.tld"

%><%@ taglib prefix="commercecontext" uri="futuretense_cs/commercecontext.tld"

%><%@ taglib prefix="ics" uri="futuretense_cs/ics.tld"

%><%@ taglib prefix="listobject" uri="futuretense_cs/listobject.tld"

%><%@ taglib prefix="render" uri="futuretense_cs/render.tld"

%><%@ taglib prefix="searchstate" uri="futuretense_cs/searchstate.tld"

%><%@ taglib prefix="siteplan" uri="futuretense_cs/siteplan.tld"

%><%@ page import="COM.FutureTense.Interfaces.*,

                   COM.FutureTense.Util.ftMessage,

                   COM.FutureTense.Util.ftErrors"

%><cs:ftcs><%-- OpenMarket/Xcelerate/Actions/GenericDispatcher


INPUT


OUTPUT


--%>

<%-- Record dependencies for the SiteEntry and the CSElement --%>

<ics:if condition='<%=ics.GetVar("seid")!=null%>'><ics:then><render:logdep cid='<%=ics.GetVar("seid")%>' c="SiteEntry"/></ics:then></ics:if>

<ics:if condition='<%=ics.GetVar("eid")!=null%>'><ics:then><render:logdep cid='<%=ics.GetVar("eid")%>' c="CSElement"/></ics:then></ics:if>

<ics:callelement element='<%=ics.GetVar("displayelement")%>'/>

</cs:ftcs>
You’ll see it only has one line of custom code – the <ics:callelement/> tag. By doing it this way, we have the flexibility to render any element in our Dojo tab by passing an element name in the “displayelement” variable.
4. Add Code to Trigger Opening the New Tab
By now, we’ve extended the Dojo framework to support opening a new tab with any element we like. We created a custom SiteConfigHtml which defines the Javascript function openCustomDojoTab(), we override getAdvancedUrlParams(), and we added document and view definitions to the configuration namespace. Now, we’re ready to put all this code to work.
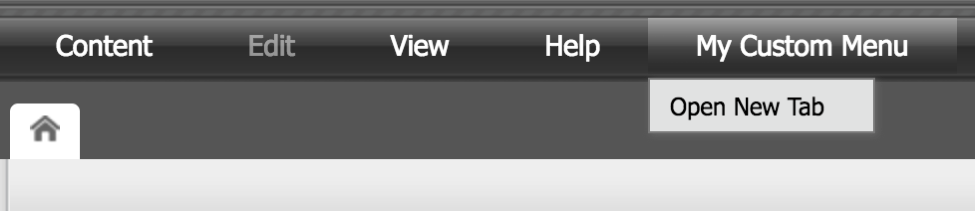
The final step is to add code somewhere in the Contributor UI to trigger opening the new tab (in other words, code that calls openCustomDojoTab()). You could do this from anywhere in the Contributor UI. For example, you could have a right-click menu item that calls it. We’re going to add a new menu item along the top called My Custom Menu > Open Custom Tab, like in the following screenshot.
To do this, go back to your element CustomElements/UI/Config/SiteConfigHtml
Just underneath this code:
config.toolbars["genericdocview"] = {

     "default": [],

}
add this code:
config.menubar['default'].push({

   "id": "myCustomMenu",

   "label": "My Custom Menu",

   "children": [

{label: "Open New Tab", action: function(){openCustomDojoTab( 'My Custom Tab', 'CustomElements/MyCustomTab');}}

   ]

});
Notice we call openCustomDojoTab() and the two parameters are the tab title “My Custom Tab” and the element to open “CustomElements/MyCustomTab”.
Once you’ve completed the above steps, reload the Contributor UI. You should now see the menu item in the Contributor UI for “My Custom Menu” and a submenu item to open the new tab.
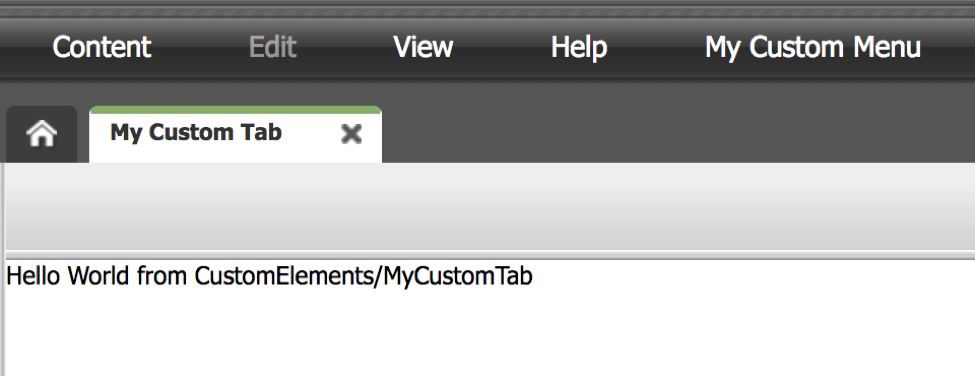
Next, create a CS Element called CustomElements/MyCustomTab. The contents of the element can simply be:
<%@ taglib prefix="cs" uri="futuretense_cs/ftcs1_0.tld"

%><%@ taglib prefix="ics" uri="futuretense_cs/ics.tld"

%><cs:ftcs>

Hello World from CustomElements/MyCustomTab

</cs:ftcs>
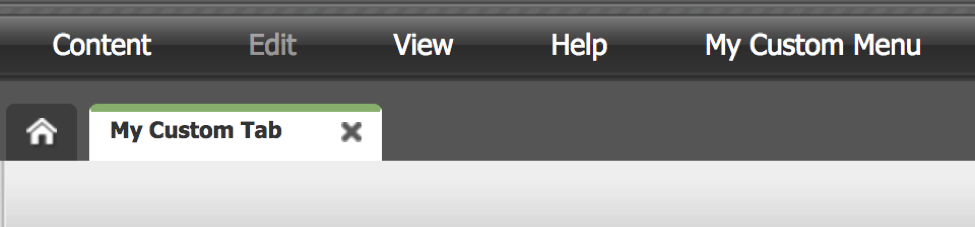
So now when you click My Custom Menu > Open Custom Tab in the Contributor UI, a new tab will appear called “My Custom Tab” and the contents of the tab will read “Hello World from CustomElements/MyCustomTab”.
Next time, whenever you want to open a new tab, you can call the Javascript function openCustomDojoTab( 'My Custom Tab', 'CustomElements/MyCustomTab' ); and simply specify the tab title and the element to be opened.
Don’t forget to deploy the GenericView.js and GenericDocument.js files to all nodes in your environment.
Next Steps
Once you have the tab opening properly, you might want some buttons along the top (like Refresh or Back), and you may want the CSS styles to match those in other tabs. (Hint: to replicate the CSS styles, you can view the source of another tab and copy/paste the HTML. You might need to play around with the exact lines you need to copy/paste.) Stayed tuned for another blog post exactly for these two topics.
- Log in to post comments
