WebCenter Sites 11g R1 (11.1.1.8.0) First Look: The WebCenter Content Connector

.8 is Here!
With the latest release of WebCenter Sites 11gR1 (11.1.1.8.0 or "dot 8"), Oracle has introduced a bevy of new features strengthening the product's appeal to developers and marketers alike. The Function1 WEM Team is hard at work dissecting these new features and will be sharing with you our findings in a series of blog posts dedicated to covering these latest product enhancements.
Introducing WebCenter Content Connector
The first in line for a "First Look" is the new integration point with Oracle WebCenter Content (WCC), the WebCenter Content Connector. This feature is key to leveraging content stored in your enterprise's existing WebCenter Content installation. Prior to the .8 release, integrating these two system was undoubtedly a custom development project. All that has changed. The new WebCenter Content Connector allows for a one-way flow of content data from WCC to Sites (technically a pull operation). Once the content is initially pulled into Sites, mechanisms can be put in place to sync the content on a scheduled basis.
Enabling the SitesIntegration Component in WebCenter Content
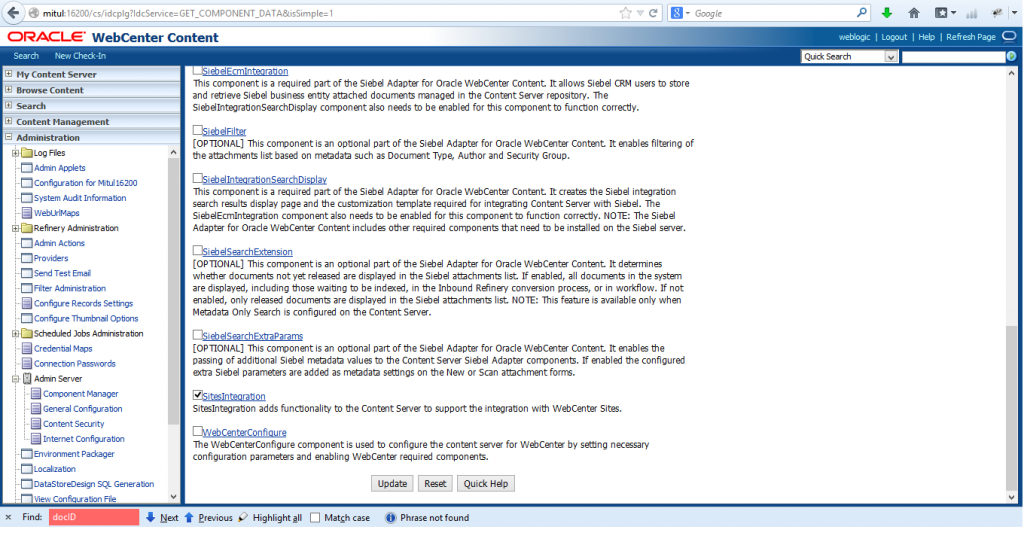
In order to get started with using this new feature you will need to upgrade to the latest release of WCC (also 11.1.1.8.0). The latest release of WCC ships with a new Component called, SitesIntegration. This component can be enabled by logging into the WCC Console and navigating to Administration-->Admin Server-->Component Manager. You can filter the components by type by clicking in the "Integration" radio button. Simply check the check-box next to SitesIntegration and click the "Update" button as seen below.
You will need to restart the WCC server in order for the change to take effect. Once you've done that, you can see that the Component has loaded successfully by Checking-In new content. You will see a new field in the Content Check-In form near bottom called "Sync to Sites". This informs Sites that the item being Checked-In is a candidate to be synced to WebCenter Sites.

Introducing the Connector Admin Tab
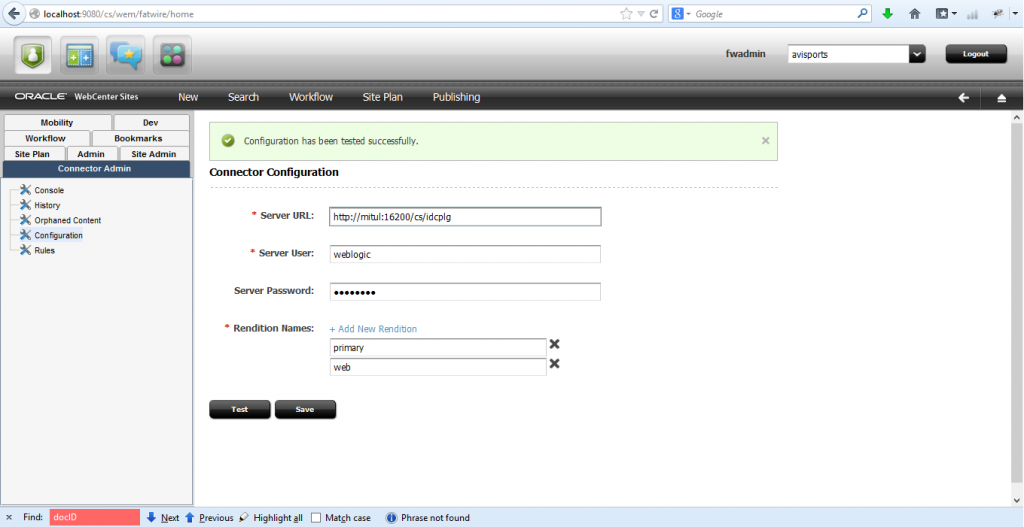
Now that you've prepped your WCC installation, it's time to take a look at the new "Connector Admin" tab in WebCenter Sites 11gR1 (11.1.1.8.0). You should be able to the see the Connector Admin tab in the Admin UI, but if you cannot, you will need to enable the tab for your user account. Once you can view the tab navigate to the menu-item called "Configuration". There you will enter the WCC server URL and login credentials that will be used to connect to WCC. The WCC server URL normally takes the form http://[Sever]:16200/cs/idcplg. You can test your settings with the "Test" button just below the form to ensure the information is correct.
Creating Connector Rules
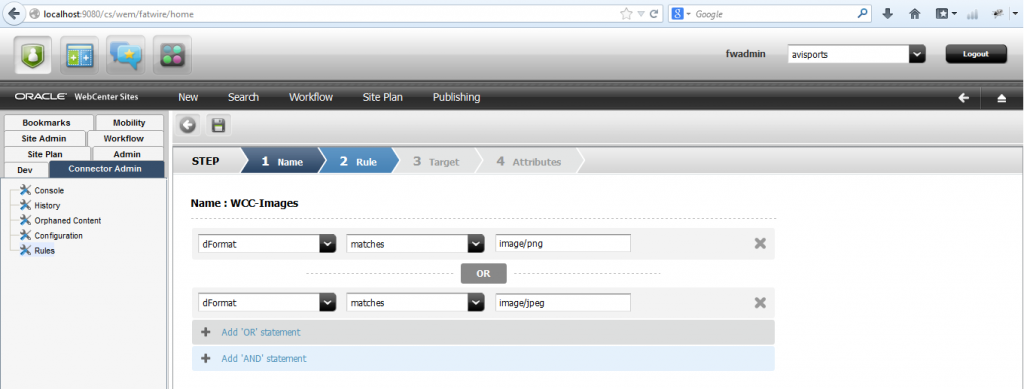
Part of the process of pulling content over from WebCenter Content includes determining what content items need to be pulled over and then regularly synced by Sites. This is done by creating Connector Rule(s) to select which content items you're interested in syncing. The content items that are identified by these rules are then mapped to a Flex Asset (basic Assets cannot be used for this purpose). The mapping occurs at the attribute level, where each Flex Attribute contained within a Flex Asset Definition is mapped to Content meta-data residing in the WCC database. You can create a new Connector Rule by clicking the "Rules" menu-item in the Admin Connector tab. After clicking the "Add New Rule" button you can name and enable your new Connector Rule. Step 2 is where it gets interesting. In the Step 2 screen, you can specify the selection criteria which will identify the content your interested in pulling into Sites. This is the step where an understanding of the WCC Schema is helpful. As you can see from the rule depicted in Step 2 below, dFormat contains mime type information in the WCC schema. Using this knowledge I created a simple rule which will select all images with a mime type of 'image/png' OR 'image/jpeg'.
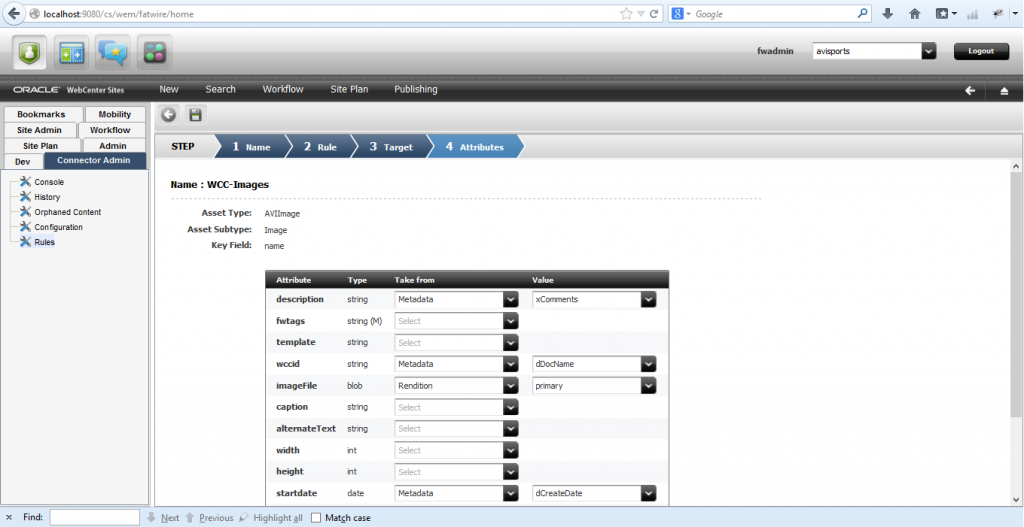
In Step 3, we configure the Target Asset Type to be used to create Assets based on the selection criteria in Step 2. In Step 3 I chose the AVIImage Asset Type. Step 4 is where you do the attribute level mapping. An example of this can be seen in the screen shot below. In this step you map each Flex Asset attribute for the Target Asset Type (in the example AVIImage) with it's corresponding meta-data from the WCC schema.
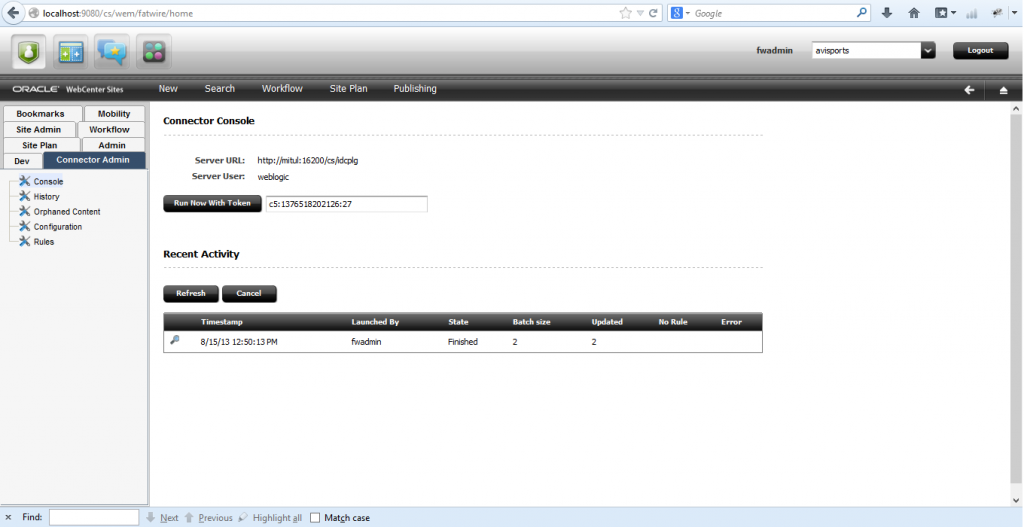
Once the rule is set-up to your satisfaction, you can import the configured content from WCC by performing a manual "pull" using the Connector Admin Console (see image below). There you can "Run Now with Token" and watch the sync progress by clicking the refresh button.
As you can see 2 assets have been updated in Sites. These 2 assets can be seen in WCC by doing a search via the WCC Search Console as seen below.

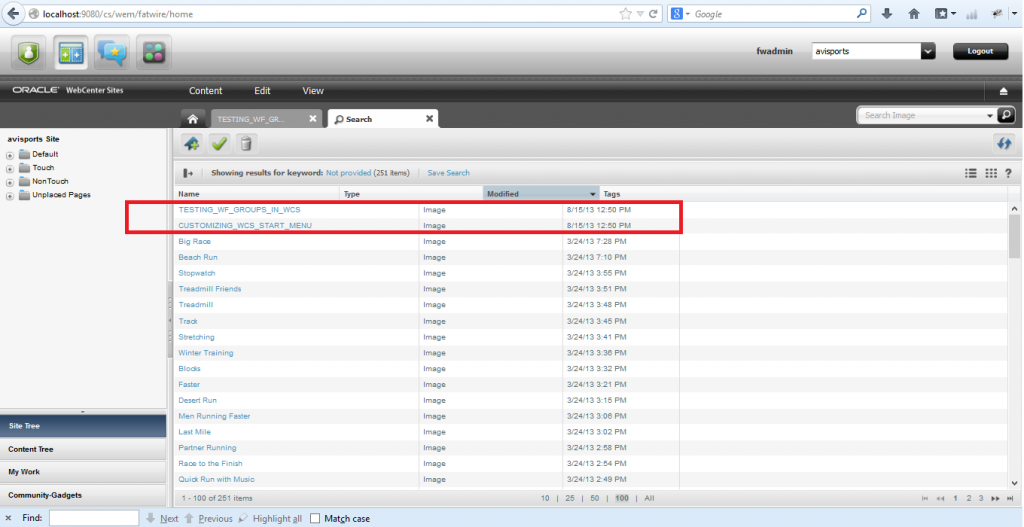
By doing a quick search in the Contrib UI for AVIImage assets, you can see (below) that these same 2 images are now residing in Sites!
Caveat with Subsequent Sync Operations
This new out of the box feature is great in that you can begin leveraging your WCC content items within Sites very quickly and effortlessly. However they are a few things you'll need to look out for. Sites is quite flexible in that after an Asset is created you can go back and change the name of that Asset with ease. After the initial import of a content item from WCC, if a Sites user unknowingly decides to change its name, a duplicate asset will be pulled into sites orphaning the original. This will be a potential problem in scenarios where content authoring and upkeep will remain in WCC.
*Important: If you are not using the connector to simply do a one-time data migration, then you will want to do the following before you set up your Rules and do your initial content import.
The easiest solution to this potential problem is create a new string attribute named "WCC Content Id" (wccid or something like that) and add it to any Asset Definition that will be potentially populated with WCC content. Then simply tell Sites to use this new Flex Attribute as the "key field" to perform the sync with WCC. You can do this by changing the file, wcc-integration.ini, located at [Sites Base Folder]\Sites\11.1.1.8.0\Shared\clustersync\ucm\ini . Simply update the property from 'wcc.keyfield=name' to 'wcc.keyfield=wccid'. A restart of the server is required for the change to take effect. Once that is done you will see the "name" field is configurable and that 'wccid' is designated key in the UI during Step 4 of rule creation (see below).

This feature is documented out-of-the-box, however the Function1 Team ran into a very small bug with it. It seems that the Sync Operation does a check to determine whether the Asset being synced to Sites from WCC already exists or not. Unfortunately, out-of-the-box this look-up is limited to "Basic Search". Thus you cannot actually use any attributes other than name, description, and createdby. In order to allow any newly created Flex attributes to be used as a key, you will need to make a minor update to the code base. Simply edit line 28 in 'CreateAsset.jsp' located at [Sites Base Folder]\Sites\11.1.1.8.0\Shared\elements\WCC\Pull.
Change line 28 which is,
nameQuery.getProperties ().setIsBasicSearch (true);
To,
nameQuery.getProperties ().setIsBasicSearch (false);
Once the change is made to 'CreateAsset.jsp' be sure to bounce your WCS cluster for the change to take effect.
This minor update will allow you to choose any value for the property wcc.keyfield in wcc-integration.ini and thus allow your Users to alter the names of imported Assets in Sites without the potential of orphaning them on subsequent Pull operations.
I hope this was helpful and be sure to look out for upcoming .8 feature reviews from the Function1 Team.
-Mitul
- Log in to post comments
