Realizing IT Compliance and High Perfomance Site Delivery with WebCenter Sites' Site Capture
What is Site Capture?
Site Capture is a web-based application that integrates with WebCenter Sites to allow for the generation of a "snap-shot" of your dynamically published website. The application consists of the Site Capture Interface accessible by the "Camera icon" from the WEM admin screen. The Site Capture interface allows you to create and configure web crawlers used to "capture" the state of your website at various times. It does this by dynamically crawling and downloading site resources (html, js, images, css, etc.) from your site and writing them to the file system based on the crawler's configuration . You can potentially have from 1 to many crawlers and each crawler can potentially be on its own schedule. For example, you could schedule one crawler to crawl your entire site at the end of the day, while another could be scheduled to run 4 times a day and also be limited to a section of the site where content is updated more frequently. As you can see, Site Capture is preferred over "Export to Disk Publishing" as it is a much more flexible, highly configurable, robust and scalable solution for static delivery of your website.
Why use Site Capture?
There are two main reasons an organization would choose to use the Site Capture application. The first use for Site Capture is static delivery of your site as a means to achieve high availability and performance. If you're looking to looking to significantly reduce page load times or improve site scalability, Site Capture may be the solution you've been looking for. Another very good reason to use Site Capture is to generate regularly scheduled static "snap-shots" of your site for IT compliance and auditing purposes.
Running a crawler in Static Mode vs. Archive Mode
After installing the application, you can run Site Capture crawlers in two modes, Static mode and Archive mode. Running Site Capture in Static mode results in the site being saved as individual files with only the last "snap-shot" being kept. Alternatively, running a crawler in Archive mode results in a series of zip files being stored, one for each crawler run. Static and Archive captures can either be run manually via the web interface or automatically triggered by the completion of a WebCenter Sites real-time publishing session.
Creating your own Crawler
Step 1: Copying the Starter Crawler Configuration File
In order to facilitate setting up your first crawler, you will utilize the Configuration File that is installed with the 'Sample' crawler. You can either use the UI to open up the "Sample" crawler and then copy the contents of the Configuration File to create one locally, or simply copy the CrawlerConfigurator.groovy file from the host file system (at <Site Capture Install Directory>/fw-sitecapture/crawler/Sample/app/) to your local machine.
Step 2: Defining a Crawler in the Site Capture Interface
Using the "Sample" crawler's Configuration File that we've just obtained, we will now set up our first crawler. Simply navigate to Site Capture->Crawlers->Add Crawlers and add a Name and Description for your crawler, then browse to and select the local copy of CrawlerConfigurator.groovy using the file selector. This creates the new crawler.

The installation directory will look like the following: (where <crawlerName> is the name of the crawler you just created)

Step 3: Editing the Crawler Configuration File (CrawlerConfigurator.groovy)
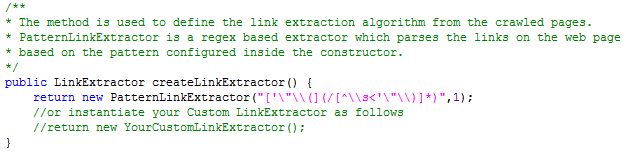
In order to completely control all aspects of the crawl process for your crawler, you will need to go in and edit the Configuration File you just used to create your first Site Capture crawler. Using the Site Capture interface, you can go in and edit the Configuration File called CrawlerConfigurator.groovy. The crawler is highly customizable and allows you to completely control a crawler’s site capture process. The Configuration File, CrawlerConfigurator.groovy, actually contains an implementation of the class CrawlerConfigurator. This class extends the class BaseConfigurator, which is an abstract class, and provides default implementations for the crawler. The only two required method implementations include getStartUri and createLinkExtractor. The getStartUri method allows you to specify a list of URIs from where to begin crawling.

The createLinkExtractor method is used to return a class that implements the LinkExtractor interface. A concrete implementation of LinkExtractor is responsible for extracting the links from each web page that is reached by the crawler. There's an Out-of-the-Box implementation class called PatternLinkExtractor available for you to use. As you can imagine, this class allows you to specify a regular expression pattern that is used to match URIs within the extracted source text of the given page being crawled. Alternatively you can implement your own extraction logic beyond the simple pattern matcher provided. You can do this by creating your own class that implements the LinkExtractor interface and overriding the necessary methods, and then instantiating it instead of the simple pattern matcher in the createLinkExtractor method.
There are a large number of optional crawler customizations available with Site Capture. You may want to override any number of these Groovy methods to customize the crawl process to your liking. An inventory of available options is listed here:
- getMaxLinks
- getMaxCrawlDepth
- getConnectionTimeout
- getSocketTimeout
- getPostExecutionCommand
- getNumWorkers
- getUserAgent
- createResourceRewriter
- createMailer
- getProxyHost
- getProxyCredentials
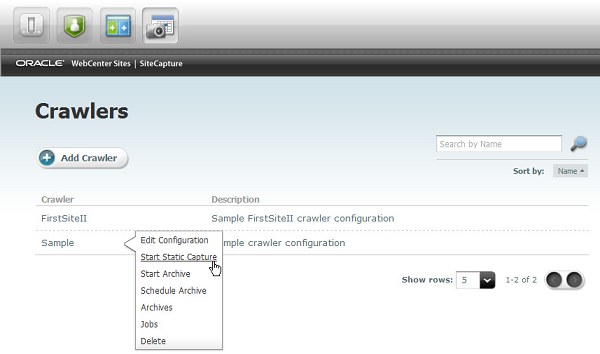
Step 4: Starting a Crawl
Once you've customized CrawlerConfigurator.groovy it's time to kick off a crawl to begin a Site Capture process. You can do that by selecting one of the options from the pop-up menu ('Start Static Capture' or 'Start Archive' ) on the crawler that you created as seen below.
After the crawler completes you will have a new set of directories as seen below. The result of your crawl (your static site) will be located under <Site Capture Installation Directory>/fw-site-capture/crawler/<crawlerName>/www .
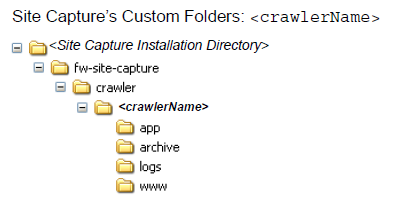
If you were to have run an Archive Capture, your archived zip file would be located under <Site Capture Installation Directory>/fw-site-capture/crawler/<crawlerName>/archive . There's obviously a lot more to Site Capture than can be covered here, but that's certainly the gist of it!
Need Help?
As you can see, Site Capture for Oracle WebCenter Sites is a great solution whether it's used to generate site archives for IT Compliance purposes, or to achieve high availability via static delivery of your site. Function1 has extensive experience installing and customizing Site Capture for WebCenter Sites. If you are considering it as a solution for your organization, you should definitely consider consulting with our team of experts! We hope to speak to you soon.
Until next time,
Mitul
- Log in to post comments
