Passing Time
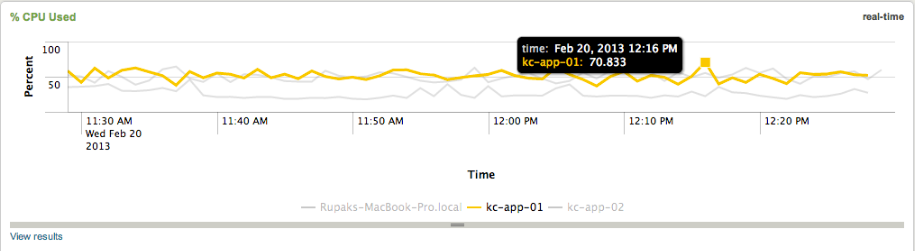
System monitoring dashboards are something we are often asked to provide for our clients. Normally, this is a pretty straight forward task, but on a recent client engagement, I was presented with one requirement that was a bit out of the ordinary. This client was looking to monitor a set of ten desktops with a real-time dashboard that would display in their office. They wanted to see all of the standard metrics like cpu, memory, and disk. If there was a spike in a time chart for say % CPU Usage, they wanted to be able to click on the spike and drill down into another view. They wanted the drill down view to show all of the cpu data for the specific host they clicked on, and wanted the time range of the data displayed to be +/- 30 seconds of the data point they clicked on. Passing a time argument to another custom view was something that was new to me. I did some research and wanted to share the solution I came up with.
This task could not be achieved easily with the core xml modules that are shipped with Splunk, so I downloaded and installed the Sideview Utils app (if you haven't checked this out before, I would highly recommend it!). By using the Redirector and URL Loader modules, you can simply pass arguments from view to view.
The Redirector module has parameters that will allow us to pass arguments to another view. We will be using the url parameter to direct the user to our desired view once they click on the % CPU Used time chart.
The other parameter we will use is the arg.foo parameter. You can read more about this parameter in the Sideview Utils documentation. Basically, it allows you to pass various arguments from any upstream module to another view. Take a look at the xml code below that passes the host and epoch time value to the next view:
<module name="Redirector">
<param name="url">F1_CPU_Monitor</param>
<param name="arg.host">$click.name2$</param>
<param name="arg.time">$click.value$</param>
</module>
The "foo" part of the "arg.foo" parameter is the name of the field that is appended to the URL. Here is an example of the URL on the drill down view:
http://localhost:8000/en-US/app/search/F1_CPU_Monitor?time=1361223120.00...
As you can see, the arg.time parameter added time=<value> to our URL.
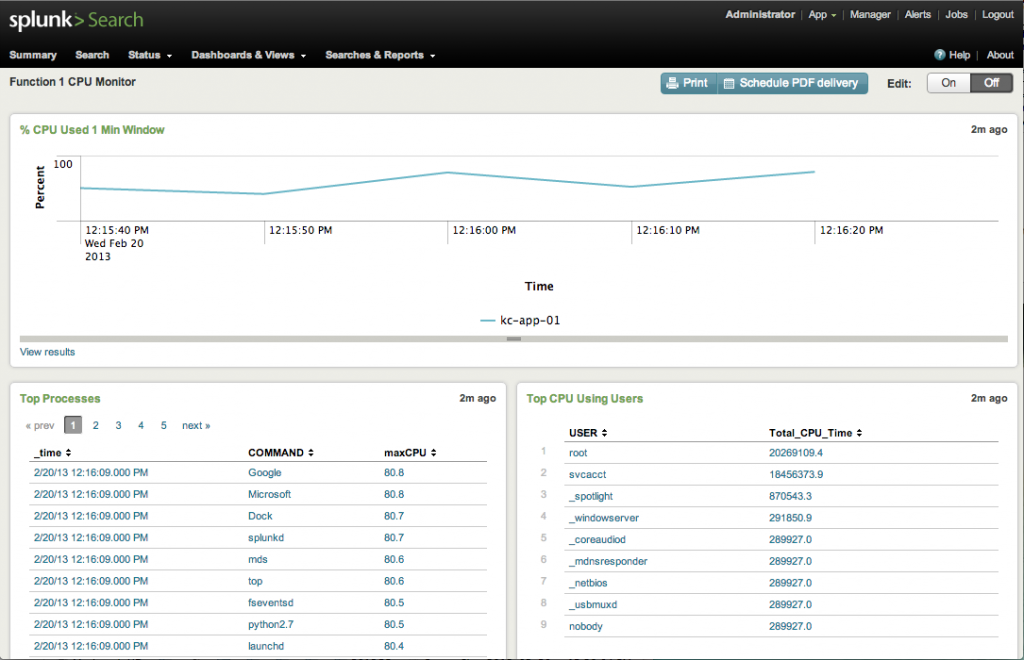
For the drill down view, as mentioned earlier, the client wanted to see three panels pertaining to cpu metrics so they could correlate anomalous activity and remedy the problem.
In order to use the values in the url, we must use the URL Loader module. Keep in mind that this module only affects modules that are present downstream from it. Take a look at the example below:
<view autoCancelInterval="90" isVisible="true" objectMode="SimpleDashboard" onunloadCancelJobs="true" refresh="-1" template="dashboard.html">
<label>Function 1 CPU Monitor</label>
<module name="SideviewUtils" layoutPanel="appHeader" />
<module name="AccountBar" layoutPanel="appHeader"/>
<module name="AppBar" layoutPanel="navigationHeader"/>
<module name="Message" layoutPanel="messaging">
<param name="filter">*</param>
<param name="clearOnJobDispatch">False</param>
<param name="maxSize">1</param>
</module>
<module name="DashboardTitleBar" layoutPanel="viewHeader"/>
<module name="Message" layoutPanel="navigationHeader">
<param name="filter">splunk.search.job</param>
<param name="clearOnJobDispatch">True</param>
<param name="maxSize">1</param>
<param name="level">warn</param>
</module>
<module name="URLLoader" layoutPanel="viewHeader" autoRun="True">
<module name="Search" layoutPanel="panel_row1_col1" group="% CPU Used 1 Min Window" autoRun="True"> […] </module>
<module name="Search" layoutPanel="panel_row2_col1" group="Top Processes" autoRun="True"> […] </module>
<module name="Search" layoutPanel="panel_row2_col2" group="Top CPU Using Users" autoRun="True"> […] </module>
</module> <!-- END URL Loader -->
</view>
As you can see, I nested all of our search modules in the URL Loader, allowing them access to the arguments in the URL.
In order to input the values that are appended to the URL, you must surround the field name with "$" within your search. The search that was used to populate one of the panels with the 1 minute window is below:
index=os sourcetype=cpu host=$host$ | multikv fields pctIdle | eval Percent_CPU_Load = 100 - pctIdle | timechart span=10s max(Percent_CPU_Load) by host | where _time > $time$-30 | where _time < $time$+30
Splunk stores time in unix epoch format. In order to provide the client with the 1 minute window, I used the "where" command to create the desired time range by adding and subtracting 30 seconds to the passed time value.
Now the client is able to react if they see a spike in one of the metrics on the dashboard that is constantly being displayed in their office (e-mail alerts were also set up). The client would need to simply log into Splunk in order to access the details. Then, they would be redirected to the drill down view that provides them insight into what was actually occurring during that moment in time. They were able to react and remedy any issues with these ten desktops in record time.
If this sounds like something you and your team would be interested in having, but need some help setting it up, let us know. Contact us at support@function1.com and let's see how we can help!
Image courtesy of http://static.icr.org/i/wide/biological_clock_wide.jpg
- Log in to post comments
