Using GIT to Manage Splunk

Does your Splunk team struggle with managing and coordinating configuration changes to your Splunk Enterprise deployment? Do all of your Splunk administrators use a single system account to modify files? Have you had to merge changes from a swap file into your serverclass.conf file?
If you answered yes to any of these questions, then I have some tips for you regarding how to leverage version control system (VCS) software on Splunk configurations - making life easier for your team. Note that using version control is not meant as a backup storage for Splunk configurations; but rather as a collaborative workspace to work on files that change often. In the realm of Splunk, it is typically the system-local (/etc/system/local) configurations and applications (/etc/deployment-apps) on the Deployment Server that change frequently. Using VCS for user specific configurations (etc/user) is not necessary since a system backup can be leveraged instead.
While there are several options for VCS, we are going to cover using a simple GIT repository for the Splunk Deployment Server configurations and apps. If you have not worked with GIT before, please familiarize yourself with some basics here before continuing with the process below. Once you have a good handle on GIT concepts, the first prerequisite is to create/request an empty GIT repository (i.e., called SplunkDS) on a GIT server.
Load Initial Repository from Deployment Server
Once the repository is created, create a GIT account for the Splunk system user and for each Splunk team member needing access to the Deployment Server files. Then, follow the steps below to load the repository:
1) Log in to the Deployment Server and ensure you are the user which owns the Splunk DS files.
2) Set up your SSH key and add the public key to the Splunk system account on the GIT server. You can find detailed steps for this on the interwebs, so we'll skip it here.
3) Navigate to the etc folder on the Splunk Deployment Server (i.e., /opt/splunk/etc )
4) Initialize the Git repository:
$ git init
5) Create a file called ‘.gitignore’ with the following contents. The below allows only the etc/deployment-apps and the etc/system/local folder to be commited into the repository.
*.DSStore
*.tar
*.tgz
*.gz
*
!deployment-apps/*
system/*
!system/local
6) Add all [unignored] files and commit:
$ git add .gitignore
$ git commit -m 'Adding base gitignore file' .gitignore
$ git add .
$ git commit –a –m ‘Initial commit with deployment server deployment apps and system local configs’
7) Add a remote for the GIT server and push the changes up.
Initialize Working Environment
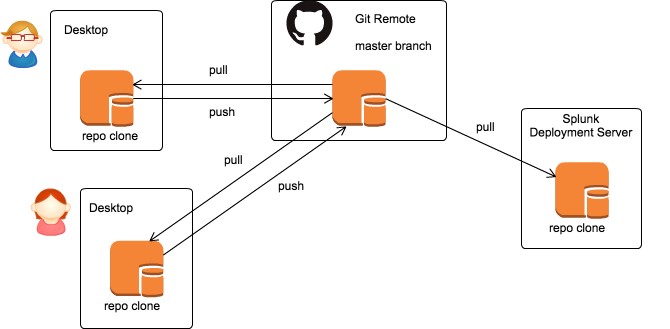
Once the repository is updated on the GIT server, you can have your Splunk team clone the repository using their own GIT accounts on their own machines. Our end goal is to have each team member updating the repository clone on their local machine, make updates locally, push changes to the GIT server, and the pull the updates to the Deployment Server.
Ok, let’s get started with setting this up. As a Splunk administrator, you only need to clone the SplunkDS repository to your personal machine initially.
1) Clone the repository:
$ git clone <Remote URI>
2) Update your global GIT settings for yourself:
$ git config --global user.name "<name> <userid>"
$ git config --global user.email "<email>"
Ongoing Team Updates
On an ongoing basis, as the team updates and deploys the deployment server classes, they should follow the below procedure:
1) Get latest from remote:
$ git pull
2) Add /make the changes to the necessary files.
3) Commit the changes with a comment. GIT add allows you to add new files/folders to the repository for version control.
$ git add .
$ git commit -a -m ‘Updated files for new onboarding request’
4) Push changes to remote:
$ git push origin master
Deployment
Finally, when your changes are pushed to the master branch, you log back in to the Deployment Server to deploy your changes:
1) Log in to the Deployment Server.
2) Pull down latest code from the GIT server:
$ git pull
3) Reload-deploy the specific server class on the Deployment Server:
$ /opt/splunk/bin/splunk reload deploy-server –class <specific server class>
With this basic GIT model, if you run into issues with a specific commit, you can always rollback to an earlier commit by using 'get reset --hard'. While this is a repeatable process to enable teams, it is fairly manual. But continuous deployment, from the GIT server to the Deployment Server, can also be implemented using pipelines.
I'm sure other Splunkers have found various ingenious ways to use GIT with Splunk. Let us know in the comments below!
- Log in to post comments
