Reducing Click Counts for WebCenter Sites Users
By: Mitul Patel January 04, 2017


Click-iddy Click Click Click
The usability of a system can and will effect the level of satisfcation that users feel when working with it. This will impact the initial adoption of a new system injected into a workplace as well as the overall satisfaction with it over time. In the case of WebCenter Sites, as an Adminstrator, it is to your advantage to reduce click counts during content authoring and system use thus keeping contributors working efficiently. This goes a long way towards staving off resentment and the feeling of being "stuck" with a system.
This is Soooooo Annoying!
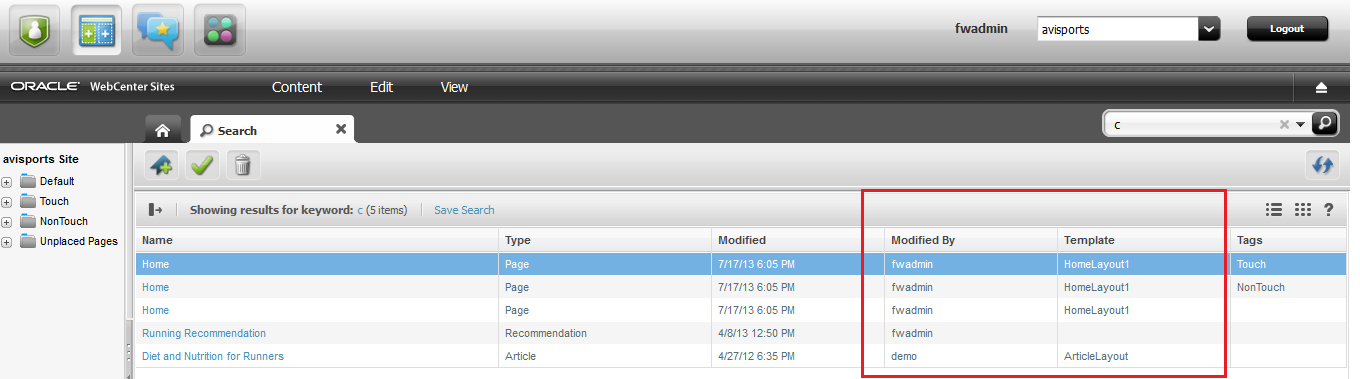
I had a recent client whose Administrators, in the context of workflow and publishing, were intererested in knowing who modifed an asset last. When performing searches in the Contributor UI they needed to click down into the detailed asset view in order to dig up this information. Also, content authors wanted to know which template was set for a given asset but were finding themselves, again, having to click down into the detailed asset view to find out this information. Doing this over and over was becoming tedious a.k.a. "annoying", and it was quickly brought to my attention. The following step by step guide will show you how to add the updatedby and template details to the Deafult Search Layout in the Contributor UI. This will allow users to see these bits of information right in the search results, thus allowing them to prevent unneeded drill downs.
Step by Step to Enhancing the Default Search Layout in the Contributor UI
- Using Content Server Explorer copy the element UI/Layout/CenterPane/Search/View/ListViewConfig to the site where you would like this customization to appear. In this example, I have copied it to CustomElements/avisports/UI/Layout/CenterPane/View/ListViewConfig.
- Once you have the copy in place edit the xml to add the following updatedby and template xml nodes just AFTER the updateddate field element as seen below:
<field id="updateddate"> . . . </field> <field id="updatedby"> <fieldname>updatedby</fieldname> <displayname>Modified By</displayname> <width>160px</width> <formatter></formatter> <displayintooltip>true</displayintooltip> </field> <field id="template"> <fieldname>template</fieldname> <displayname>Template</displayname> <width>160px</width> <formatter></formatter> <displayintooltip>true</displayintooltip> </field> - Run the following SQL using Support Tools or any means you have to the WCS DB on the Mgmt Instance that you are implementing this Customization on: Select urlfielddescriptor from IndexSourceMetaDataConfig where name=’Global’
- Using support tools or the DB Tool that you have access to run the following SQL and note down the resultant value for urlfielddescriptor: Select urlfielddescriptor from IndexSourceMetaDataConfig where name=’Global'
- On the server’s file system navigate to and open for edit the file located at ${WCS_HOME}\Shared\Storage\IndexSourceMetaDataConfig\[The path from urlfielddescriptor in Step 2]
- Append the following to the end of the line ensuring not to add any additional spaces or line breaks and save it, so that the entire file is one long semicolon separated list (of lists) : updatedby,TEXT,false,true,100;template,TEXT,false,true,100;
- Now that you have updated the Search List View for avisports you will need to re-index the data to make the additional data fields available to display. To do this, log into the WCS instance where you are doing the customization and open the Admin UI and Navigate to Admin >> Search >> Configure Global Search. In the dropdown menu select “Re-index”. Select the top check box to select ALL Asset Types and click ok. A green confirmation telling you that all of the individual Asset Types Search Index to be re-indexed will appaear. Give the system some time to re-index all of the assets. In the mean time you will see empty column data for “Updated By” and “Template” while the re-index is taking place but after it is complete you will see the columns populated where the data is available.
Once the indexing completes you will see the fields populated as outlined in red below:
I hope you found this useful.
Until next time,
-Mitul
- Log in to post comments
