Converting Basic HTML/CSS into a Drupal Theme
Drupal offers some great free theme options, but what if you already have a website theme? What if the options just don’t fit the subject of your website? The idea of creating a custom Drupal theme from scratch may seem daunting, but even with next to no knowledge of PHP, it can be accomplished! Drupal has a great theming guide explaination (https://drupal.org/node/171194). There are several pieces to the theme puzzle, and all will be covered in this article, creating a custom theme from scratch.
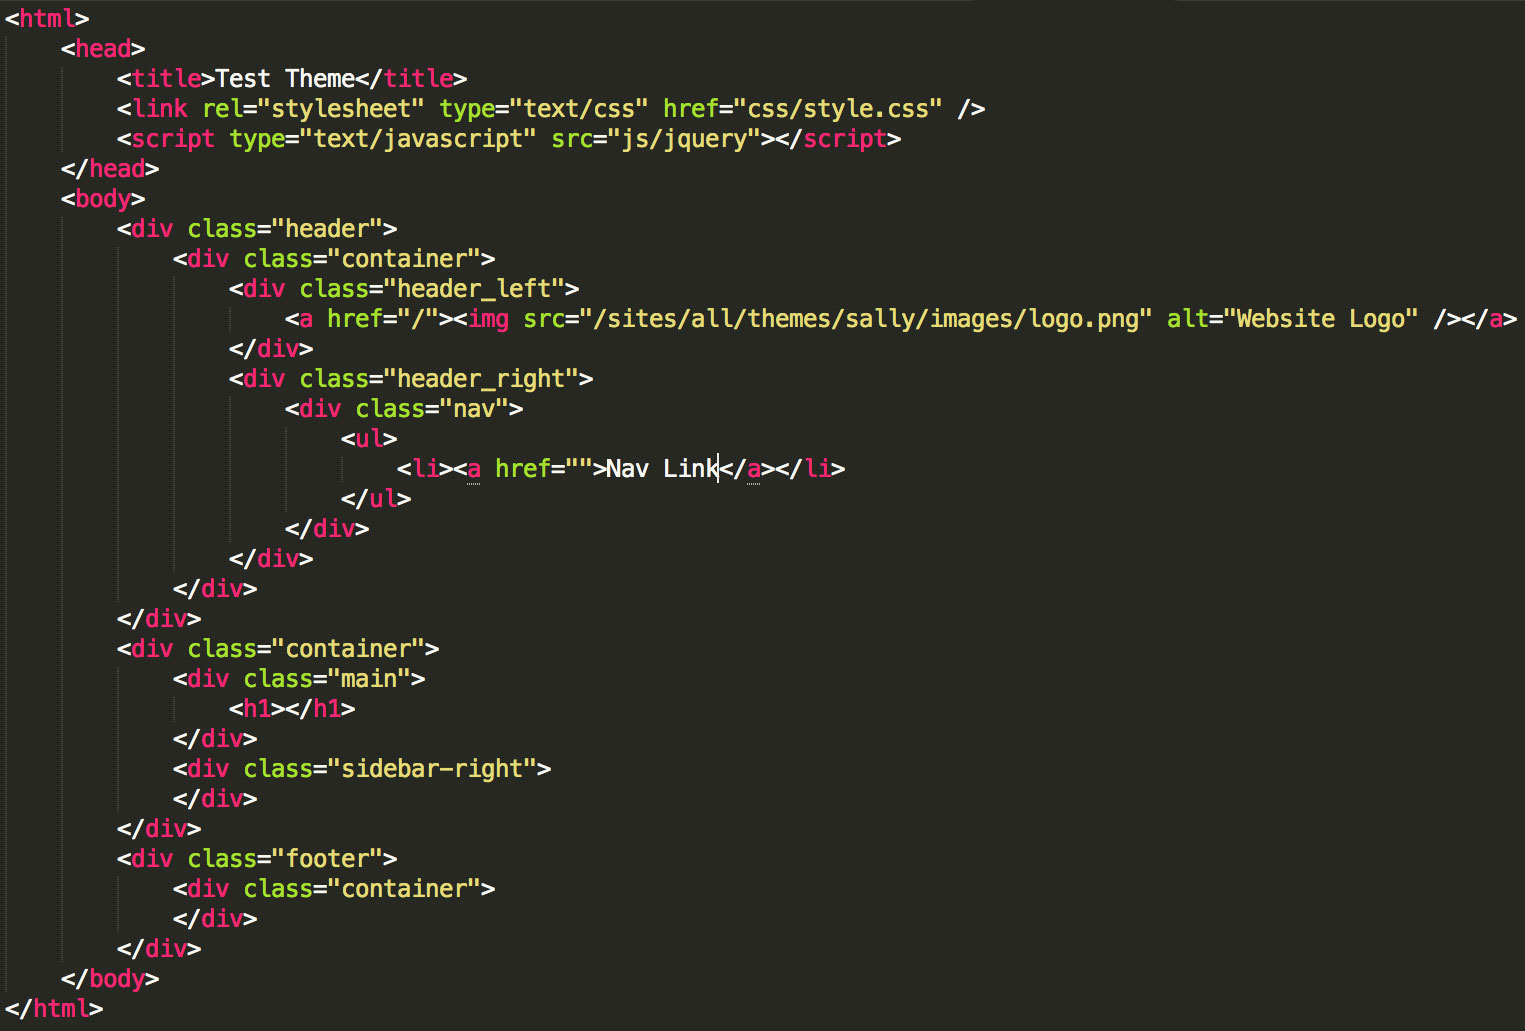
We’ll create a theme in this post from start to finish. The files we’re starting with are one test.html file, which has our basic html code and the style.css file with our styles. If you’re taking an existing theme you should have access to the css file and then choose any html file on your server that has the sections you want to use. I’m going to call this theme Sally (no rhyme or reason, just a short “unique” name). First let’s talk about folder structure. Your theme will go in your /sites/all/themes/ folder, and a structure I like is:
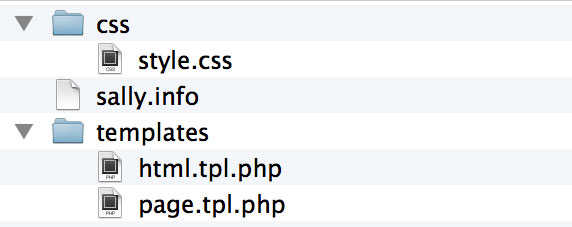
This example has folders to organize all your files. You’ll be linking to those various files within the theme.info file, so if you’d like to simply keep everything in the theme’s folder that would work. Now for the files, the minimum needed are:
-
theme.info (in our case sally.info)
-
style.css
-
page.tpl.php
-
html.tpl.php
theme.info - This file holds the important information about our theme, including the name, drupal version, regions, location of style sheets, javascript, etc. Drupal again provides some excellent documentation with a list of all the various bits and pieces one can add to the .info file (https://drupal.org/node/171205). Now let’s take a look at the minimum requirements for this file:
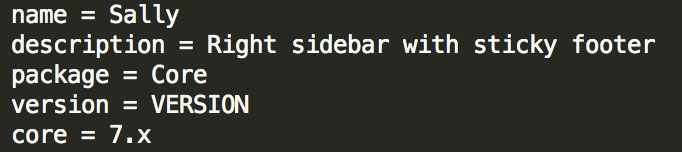
The name will be the name of our theme. You’ll want it to be on the shorter side, incase you want to add functions to your template.php file they will need to contain the theme name. The description is what it sounds, just a short description about your theme. They normally contain the main content areas, sidebars, if it’s using a grid system, etc. The package in this case is simply “Core”. The version number is not required in Drupal 7, so this line will automatically set it to the drupal core version. Lastly you have the core, which means the Drupal core version. Different core versions will have different theme template requirements.
Next thing we need to add to your theme info file are the style sheets, any javascript, and the content regions.
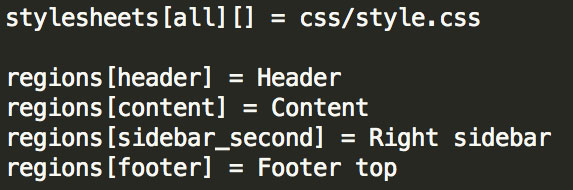
With this basic theme we’ve only included one file for the CSS, but to add additional CSS simply copy/paste and change the filename. For the CSS you can specify if the file is for print or screen as well, and even add specifications such as:
stylesheets[screen and (max-width: 600px)][] = css/theStyle600.css
JavaScript is added with this line:
scripts[] = js/javascript_file.js
With JavaScript files in general, you’ll need to either include them in the .info file, or use a function in the template.php file. This file lives within the theme folder (/sites/all/themes/sally/template.php), and contains little tweaks to your site. We use little functions so we don’t have to create a dozen custom modules, but that’s another article. Javascript that will be used on every page (or almost every page) should be added to the .info file. Drupal will automatically add a jQuery version to your page, and you can find more info about JavaScript and Drupal here: https://drupal.org/node/171213
The next thing we should add are regions. These will show up under the /admin/structure/blocks section, and allow us to place “blocks” of content into our various regions. Notice the text within the brackets is lowercase and uses an underscore instead of a space. This is the “machine name” for our region, and the text after the equals is our visual text, what we will see on the page. Now that we’ve declared our sections here, we need to create our page.tpl.php file from our test.html file, which means we’re adding in some PHP. If you’re not a PHP developer, fear not! You’ll be able to simply copy/paste the PHP and just tweak the region names so they match the ones in our theme .info file.
What’s missing? If you look within the regions you’ll notice we didn’t include the navigation. This requires one additional line in our .info file, and a little PHP in our page template. In the .info file we need to tell Drupal the main_menu is a feature we’d like to turn on:

Now let’s take a look at the HTML/PHP. Here’s the original template file without the PHP:
Now here’s the updated page.tpl.php file:
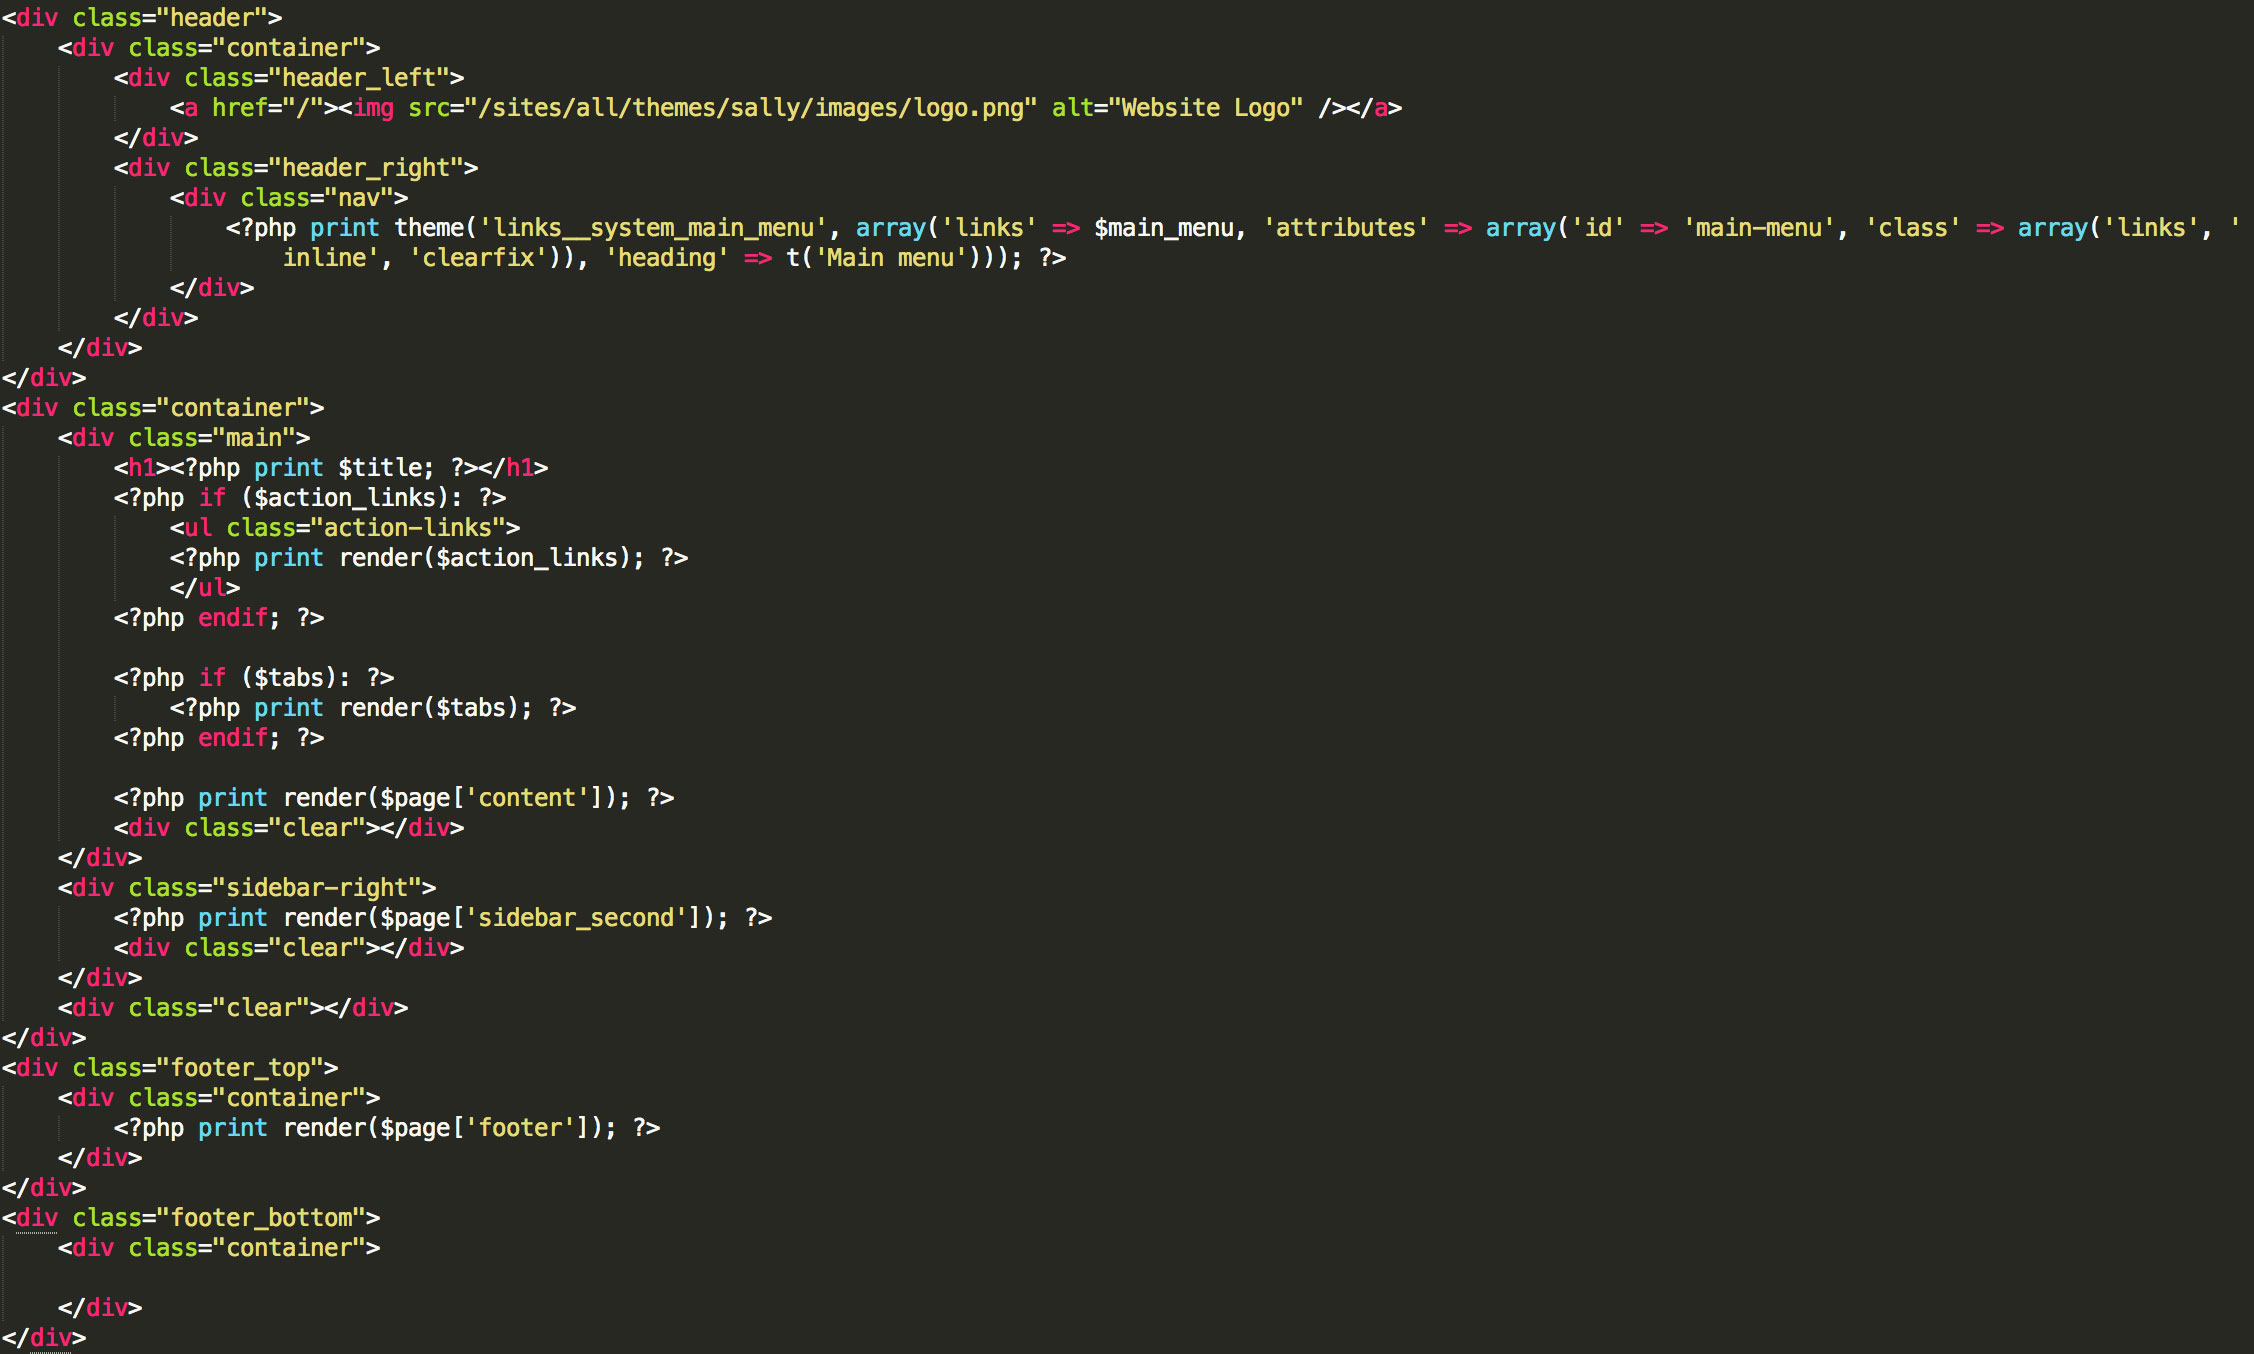
Notice the differences? We’ve completely taken out the html, head, and body tags. They will go within another template file, html.tpl.php. Our regions defined in our .info file are printed with one basic line of code: <?php print render($page[content]); ?>
What that line of code does is any block listed within the “content” region in /admin/structure/blocks will be shown in that space.
There are a few other lines of PHP we’ve added that are important as well. The “tabs” refer to actions one can take with the node in view. If you are logged into your site and navigate to a page or article, they are the tabs that say “view | edit” (possibly more options depending on additional modules). The “action links” will show if you’re viewing a block or a view, giving you links to actions directly from the page (so you don’t have to navigate to /admin/structure/views and find the view on the page). Also within the <h1> tags you’ll see we use a variable that has not been defined on the page. Normally this would be a no-no except Drupal has some global variables for our use. $title will always be the title of the node in view, and for additional variables check the list here: https://api.drupal.org/api/drupal/globals/7
Within the nav div notice the code used to show the main menu. You’ll see the “t()” tag, which simply means translation, and a must for bilingual sites. There are many ways to print a menu within your template, but this is the most straightforward. Creating a custom menu can be called a variety of ways as well, but again, another blog post (Drupal documentation really is pretty great: https://drupal.org/node/1043018)!
Now what are we missing? How about the html.tpl.php template file. We’ll need it to contain the missing info we left out of our page.tpl.php file:
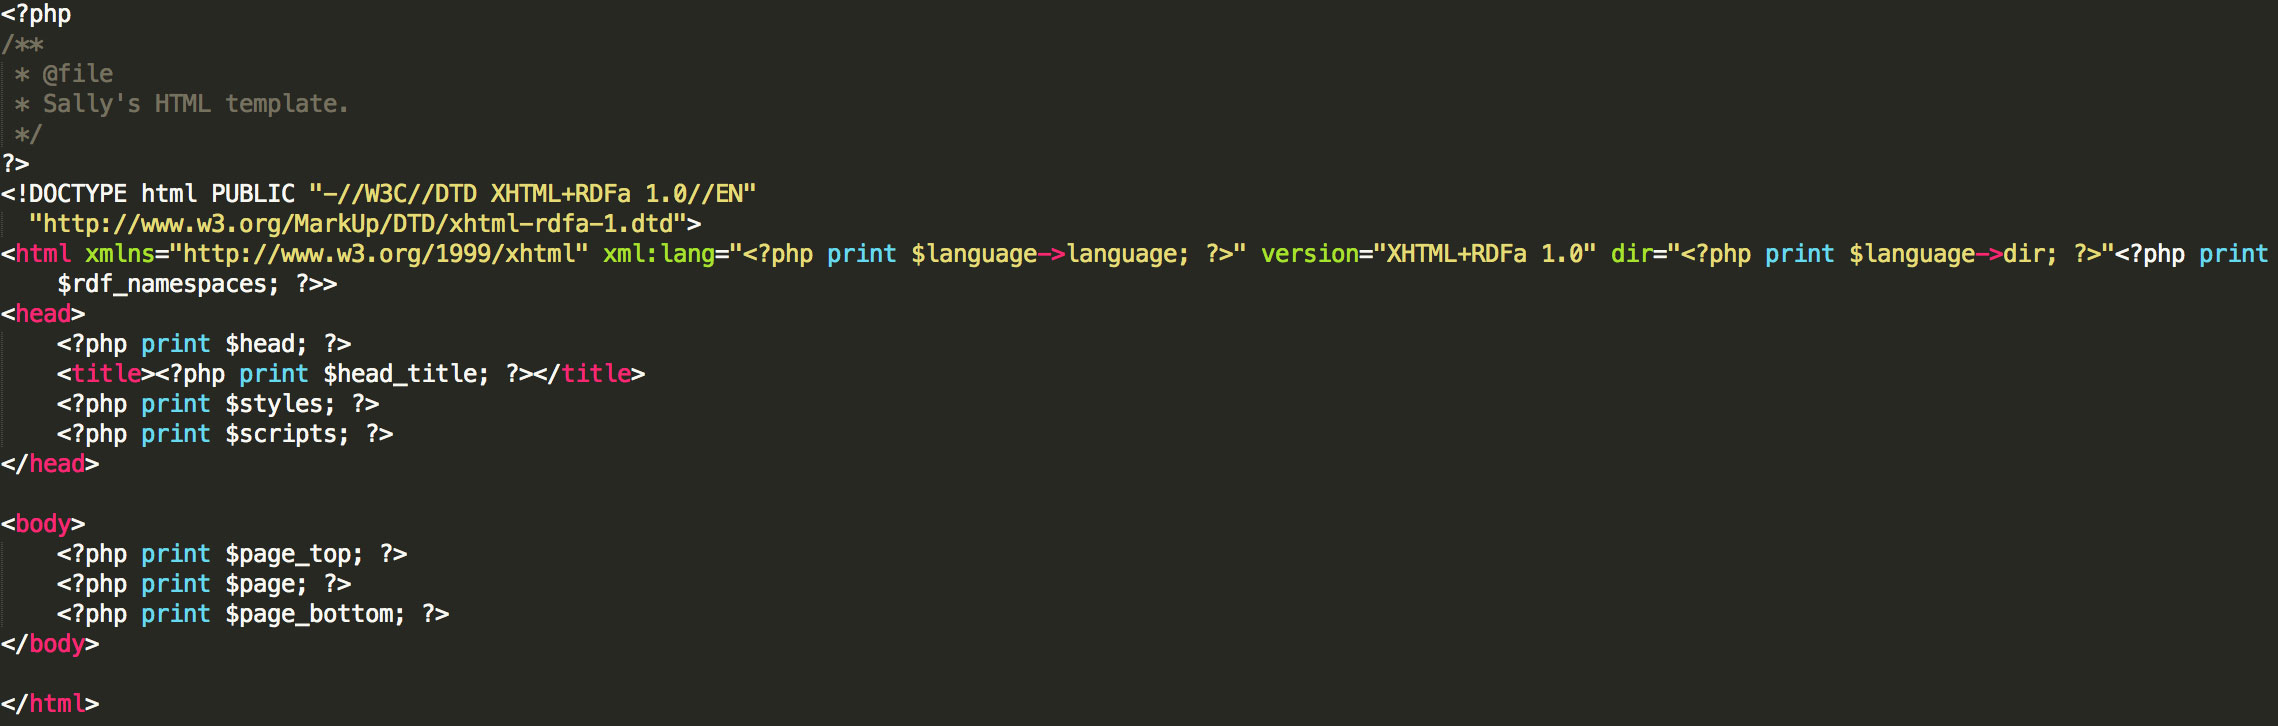
Within the head you’ll notice where we’re printing the styles and scripts, which is coming from the .info file. The “head_title” will be the website title set in the /admin/config/system/site-information section, and the $head includes default Drupal styles/scripts (including jquery). Then within the body we are printing the $page_top and $page_bottom, which contain more “behind the scenes” Drupal code, and the $page, which is where it will pull our page.tpl.php file.
The last file we’ve yet to mention is the style.css. In general, you won’t need to make many changes to this file. The one section that will probably need tweaking is the navigation, however if your nav was setup similar to our original test.html (within an unordered list), you may not need much tweaking as that is how Drupal renders it. I would recommend using a developer tool within your browser (Inspecting Element in Chrome, Firebug for Fire Fox, etc) to see how Drupal natively names items, implements the first/last children, parents, etc.
So there you have it, a custom Drupal theme from start to finish! Of course this is the tip of the iceberg, but hopefully a good launching point. If you’ve noticed the side theme, Drupal.org is a wealth of information, especially in regards to theming. I’ll end with one final link, which is the “base” to the Drupal theme documenation: https://drupal.org/documentation/theme
- Log in to post comments
