Publishing WCS content to multiple environments
Many organizations want to keep content published to a live site and Disaster Recovery (DR) site on a real-time basis to ensure that latest content will be available in case of a disaster. Prior to the WebCenter Sites 11gR1BP1 Release, we needed to develop a workflow step action and approve the content to both destinations. This approach has its own problems, and required users to run publish two separate times – one for each environment.
But with 11gR1BP1, Oracle has provided the necessary publishing hookups, which enable developers to transport the content to multiple destinations simultaneously, eliminating the need to approve to multiple queues, and the need to publish multiple times. This article explains how to implement Multi-Destination Publishing.
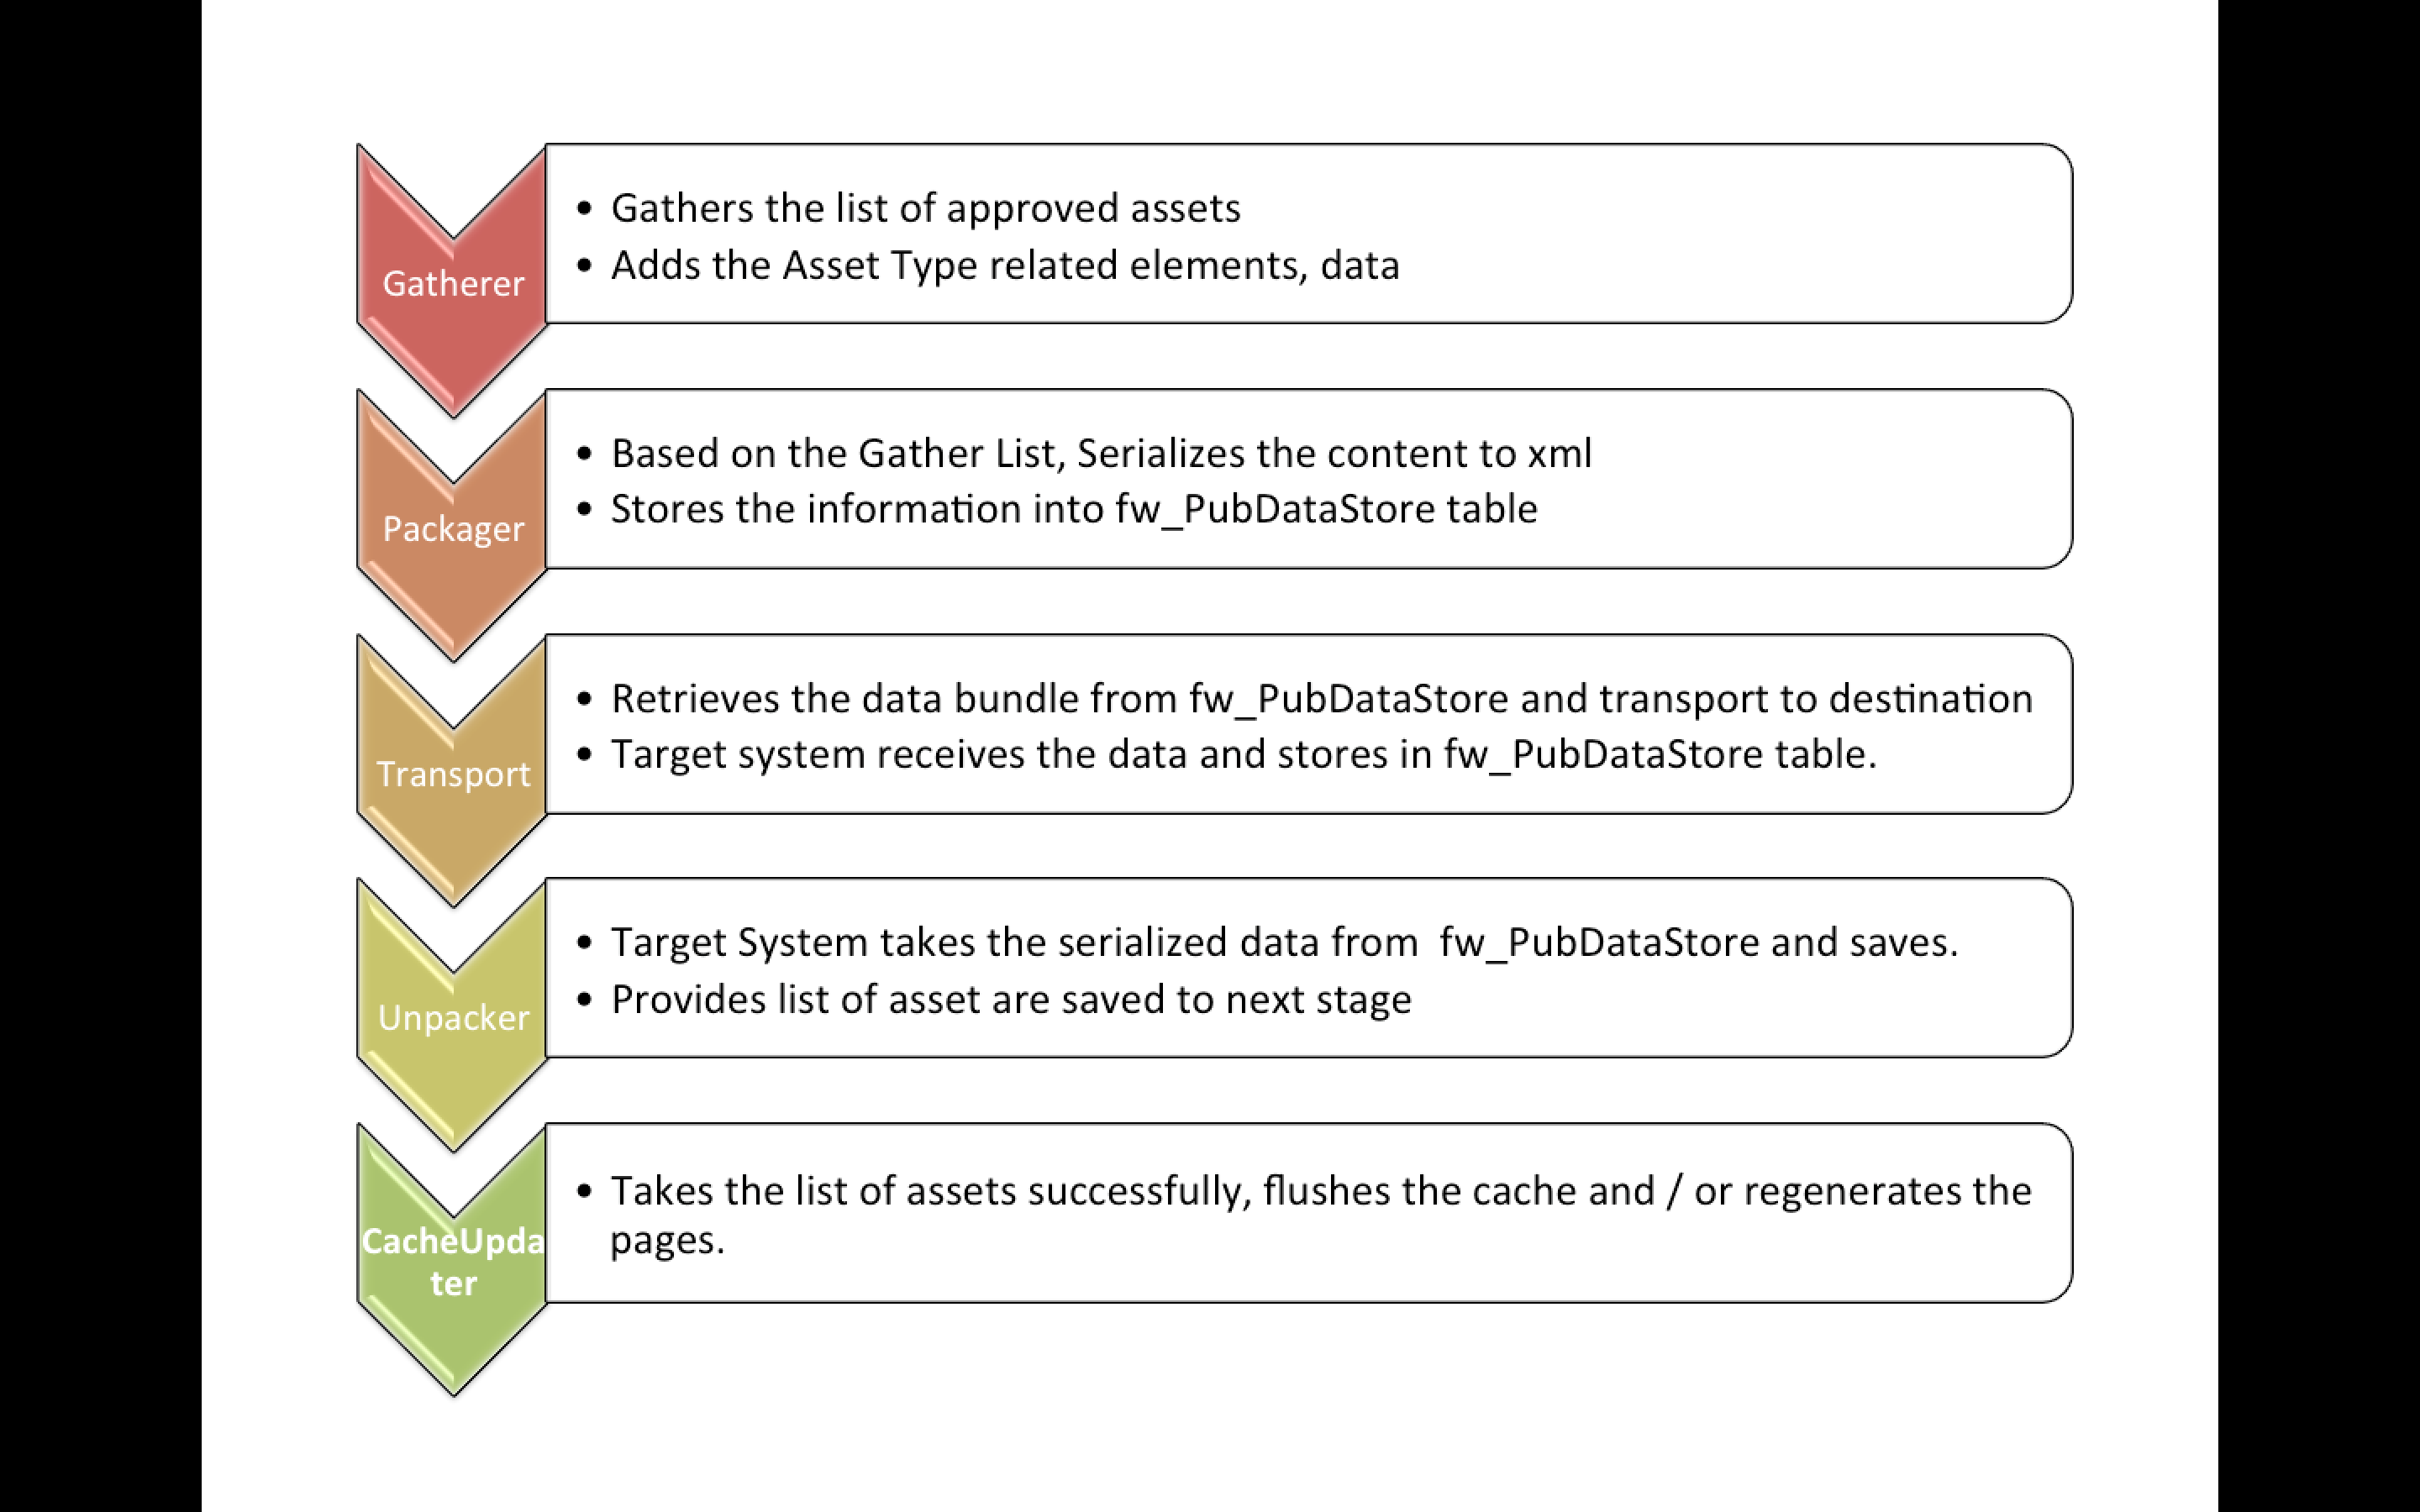
As we already know RealTime publishing has multiple stages / jobs. For quick recap following diagram shows the list of jobs and activities, which are performed as part publishing process.
RealTime publishing uses asynchronous messaging to track the status of jobs such as Unpacker sending a message back to management system as assets are saved successfully.
Transporter is the stage, which sends the serialized messages to the target system. Let’s start customizing the Transporter behavior to send the serialized message to multiple target systems.
Customizing the Transporter
Customizing transporter has two steps, in first step we need to develop a class by extending com.fatwire.realtime.AbstractTransporter and override the ping, sendBatch, remoteExecute, init, listTransports, toString methods behaviors. In second step, register newly developed transporter with publishing system by adding bean entry in AdvPub.xml file in source system.
Step 1: Here is the sample code for MultiTransporter. On thing that the documentation mentions is to use your own package name to develop these classes, but some of the inherited methods are available as protected in AbstractTransporter class. So, if you use your own package structure , it will not compile. Thus we are forced to use the package name as com.fatwire.realtime only. We hope that Oracle will fix this in an upcoming release.
Here is the source code, from WCS Developer Guide.
package com.fatwire.realtime;
//documentation says to use your own package but the methods in AbstractTransporter are protected and they are available within the package. So use same package name and jar separately.

import java.net.URL;
import java.util.ArrayList;
import java.util.List;
import java.util.Map;

import COM.FutureTense.Interfaces.ICS;
import COM.FutureTense.Interfaces.IList;

import com.fatwire.cs.core.realtime.TransporterReply;
import com.fatwire.realtime.AbstractTransporter;

/**
 * RealTime Publishing transporter to multiple targets. *
 */
public class MultiTransporter extends AbstractTransporter {
private boolean initialized = false;
List transporters = new ArrayList();

/**
 * Ping each underlying target and return true if all of them are up.
 */
@Override
public boolean ping(StringBuilder sbOut) {
init();
boolean ret = true;
for (com.fatwire.realtime.AbstractTransporter t : transporters) {
boolean thisret = t.ping(sbOut);
sbOut.append(t.getRemoteUrl() + (thisret ? " OK" : " Not reachable"));
sbOut.append(" ||| ");
ret &= thisret;
}
return ret;
}

/**
 * Send the batch to each underliyng transport.
 */
@Override
protected int sendBatch(ICS ics, IList iList, StringBuffer outputMsg) {
init();
for(AbstractTransporter  t : transporters)
{
int res = t.sendBatch(ics, iList, outputMsg);
if(res != 0) {
   // Just log the error for now, but this is an indication that the target may be down
   // and other notifications may also be appropriate.
   writeLog("Transporter " + t + " failed with " + res + " " + outputMsg);
}
}
return 0;
}

/**
 * Execute the remote command on each transporter and accumulate their
 * responses.
 */
@Override
protected List remoteExecute(ICS ics, String s, Map stringStringMap) {
init();
List res = new ArrayList();
for (AbstractTransporter t : transporters) {
List tres = t.remoteExecute(ics, s, stringStringMap);
res.addAll(tres);
}
return res;
}

/**
 * Do some initialization by parsing out the configuration settings and
 * instantiating a standard http transport * to each target.
 */
private void init()
{
   if(!initialized)
   {
String remoteURLs = getRemoteUrl();
int count = 0;
for(String remoteUrl : remoteURLs.split(",")) {
String suffix = (count == 0) ? "" : String.valueOf(count);
AbstractTransporter t1 = AbstractTransporter.getStandardTransporterInstance( );
URL url; try
{
url = new  URL(remoteUrl);
}
catch(Exception e)
{
throw new RuntimeException(e);
}
t1.setRemoteUrl(remoteUrl);
t1.setHost(url.getHost());
t1.setUsername(getParam("REMOTEUSER" + suffix));
t1.setPassword(getParam("REMOTEPASS" + suffix));
t1.setUseHttps("https".equalsIgnoreCase(url.getProtocol()));
t1.setContextPath(url.getPath());
t1.setPort(url.getPort());
t1.setProxyserver(getProxyserver());
t1.setProxyport(getProxyport());
t1.setProxyuser(getProxyuser());
t1.setProxypassword(getProxypassword());
t1.setHttpVersion(getHttpVersion());
t1.setTargetIniFile(getTargetIniFile());
transporters.add(t1);
++count;
}
initialized = true;
writeLog("Initialized transporters: " + toString());
}
 }

/**
 * Provide a full listing of all underlying transports. This is can be used
 * by other components to determine whether they need to perform special
 * actions depending on the number of targets. For example, asset publishing
 * status processing may need to buffer responses until they're received
 * from all targets before marking assets published. * @return
 */
@Override
public List listTransports() {
init();
List list = new ArrayList();
for (AbstractTransporter t : transporters) {
list.add(t.toString());
}
return list;
}

/**
 * Just a human-friendly description of the transport. This may show up in
 * the logs, so make it descriptive enough.
 */
@Override
public String toString() {
List transs = listTransports();
StringBuilder sb = new StringBuilder();
for (String t : transs)
sb.append(t + " ");
return sb.toString();
}
}
Step 2: Registering the Mutli Transporter class in AdvPub.xml file.
In AdvPub.xml, replace the line: <bean id="DataTransporter" class="com.fatwire.realtime.MirrorBasedTransporterImpl" singleton="false">
With: <bean id="DataTransporter" singleton="false">
After performing these steps, the publishing system will be able to send approved serialized assets content package to multiple registered target system. Now, target systems CacheUpdater job will notify the source system as soon as their activity is completed and source system will mark the current publishing process is completed. In this case, remaining publishing in-process target system will stop, as they will not receive the proper response from source.
To overcome this situation, we need to wait till all registered target systems send their status message and update the source system publishing status as done. This will be achieved by intercepting the publishing events on source system.
Intercepting the publishing event messages
Here are the steps to intercepting the publishing event messages on source system.
Step 1: Extend com.fatwire.realtime.messaging.AssetPublishCallback. Override the notify() and optionally progressUpdate() method.
Step 2: Enable the callback in AdvPub.xml on the management side:
a. Add AssetCallback bean.
b. Register the bean with PubsessionMonitor.
Step 1: Here is the sample code for AssetPublishCallbackMulti
package com.fatwire.realtime;
import com.fatwire.realtime.ParallelUnpacker;
import com.fatwire.assetapi.data.AssetId;
import com.fatwire.realtime.messaging.AssetPublishCallback;
import java.util.HashMap;
import java.util.Map;
/**
* Buffer asset save notifications until we've received one from each target. Then mark asset published*/
public class AssetPublishCallbackMulti extends AssetPublishCallback {
   Map saveEventsCount  = new HashMap();
   /** Receive notifications about the asset status. Currently the only available status is SAVED*/
@Override
   public void notify(AssetId assetId, String status, String from) {
        String assetIdStr = String.valueOf(assetId);
        writeLog("Got " + status + " notification from " + from + " for " + assetIdStr);
      if("SAVED".equals(status)){
         Integer numNotifications;
           if((numNotifications = saveEventsCount.get(assetIdStr)) == null )               numNotifications = 0;
           }
               numNotifications = numNotifications + 1;
               saveEventsCount.put(assetIdStr, numNotifications);
               if(numNotifications == this.getTargets().size()) {
                           super.notify(assetId, status, from);
                           writeLog("Marked " + assetIdStr  + " published");
                }
         }
    }
   /**
    * Intercept progress update messages. Can be used for monitoring the health of the system but is not required. */
@Override
   public void progressUpdate(String sessionId, String job, String where, String progress, String lastAction, char status) {
super.progressUpdate(sessionId, job, where, progress, lastAction, status);
}
}
Step 2: Enabling the Callback Bean
To add the AssetCallback bean
<bean id="AssetCallback" class="my.sample.AssetPublishCallbackMulti" singleton="false"/>
To register the bean with PubsessionMonitor
<bean id="PubsessionMonitor" class="com.fatwire.realtime.messaging.PubsessionMonitor" singleton="false">
<constructor-arg index="0">
<ref local="DataTransporter" /> </constructor-arg> <constructor-arg index="1">
<ref local="AssetCallback" /> </constructor-arg>
<property name="pollFreqMillis" value="5000" /> <property name="timeoutMillis" value="100000" />
</bean>
Jar the compiled classes and deploy to the source system’s WEB-IN/lib folder of Sites & restart.
Now to test this functionality, we need to have three Sites instances (Same versions) and we need make following changes to your Source systems, on the publishing destination edit screen.
- In the Destination Address, specify comma-separated destination URLs. For example:
http://us.mycompany.com:8080/cs/, http://mea.mycompany.com:9080/cs/
- In the More Arguments, specify ampersand-separated username, password, and optional proxy information for the additional servers, suffixed with indexes starting at 1.
For example, with one additional target:
REMOTEUSER1=fwadmin&REMOTEPASS1=xceladmin&PROXYSERVER1=proxy.co m&PROXYPORT1=9090&PROXYUSER1=pxuser&PROXYPASSWORD1=pxpass
Approve the asset to currently modified destination and publish the content. Now, you should be seeing your content changes in both the sites!
If you have any issues/questions, please contact us. We enjoy and excel at implementing and customizing the Web Center Sites product for your business.
- Log in to post comments
