A Complete Guide to Understanding the Splunk Add-on Builder
In this post, we'll walk through the ins and outs of the Splunk Add-on Builder. Not only does the Splunk Add-on Builder help users avoid common pitfalls during app development, it also validates apps according to best practices and app certification standards.
On the app homepage, you'll see every add-on created using the Splunk Add-on Builder, along with those already installed on the instance. An Add-on Builder project is an editable add-on along with its meta data. Beyond editing capabilities, you're also able to export projects for use with other instances of Add-on Builder.

The first step to creating a new add-on is designating its name. You'll then be presented with additional customization options including: author, description, version number, visibility, icon, and theme color. These will help to avoid caveats when setting some of the features we'll cover below. The Add-on Builder automatically sets the folder name using best practices to ensure compatibility with other Splunk apps.

Editing and adding custom features is also fairly simple once you have created or imported an app. Clicking on the Add-on Builder project will bring you to the project's homepage. This page will be fairly bland at first, but more information will be displayed once features are added. For example, the number of features present in the app will be shown along with the validation score of the project. The validation score is the rate at which your app is following best practices and other rules.
The first feature in the Add-on Builder is the "Configure Data Collection." This feature is used for adding a custom input method required for your data using Splunk’s modular input method. Three different modular input methods are also present: "REST API,""Shell commands," and "Python code." Upon selecting one of these options, you will be guided through the quick process of creating the modular input using a GUI which simplifies the sometimes complex operation. Once you have finished the UI portion of the modular input, you are shown the "Define and Test" portion of the creation process. At this point, depending on whichever method you chose, you can define the request, commands, or script required for the input to retrieve the data. You have now successfully created your new custom input!

The next feature is "Adding Sample Data." This is where you can define specific source type rules for your new custom input or new source types. Once a source type is selected, or a new source type is created, you are greeted with a similar interface to what appears when uploading a file to Splunk. The main difference being that in the Add-on Builder view, no data is added into Splunk; only the configuration files are created. You will also be able to upload sample data in order to view the resulting configuration.

The "Extract Fields" section allows for increased efficiency by recognizing the fields of the data. If using a commonly structured data format such as JSON or XML, selecting and parsing the data is all that is needed. If using a custom format, selecting "Unstructured Data" and parsing allows you to manually examine the events and select the desired fields to be extracted within the data.

"Map to CIM" is a feature that allows your data to be mapped to the Common Information Model. The CIM is used within various applications including Splunk Enterprise Security. Once a new CIM mapping is created, you will be guided to define a new event and source type of the desired data. On the next screen, you will see a nice GUI of the mapping process of fields shown within the data and those within the CIM. Once all desired fields are mapped correctly, selecting "Done" will successfully save these configurations.
The last feature within the Add-on Builder is "Create Alert Actions." Here, custom alerts can be created and edited, along with setting up an adaptive response action within Splunk Enterprise Security. Upon setting all of the initial information on the alert, you will see a similar setup to that of the custom inputs. This controls the visual aspect within Splunk when creating a new alert action. The "Code and Test" section will follow which permits the addition of your own python code into the editor to test and save.

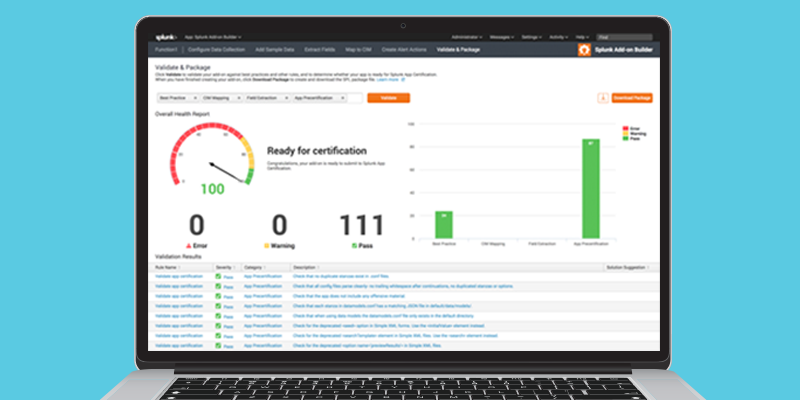
Once all of the custom features are added to your app, the final step is to "Validate and Package." This allows your app to be tested against multiple standards from best practices to app certification. After everything is all set and ready to go, packaging your app is just a single click away. Your package is now ready to be uploaded to SplunkBase or installed on other instances.
- Log in to post comments
