Altering WebCenter Sites 11g R1

In my last article , I discussed modifying an existing toolbar button in WebCenter Sites 11g R1. That article was a good primer and now I’ll take the customization into something more applicable. I’ll step through creating a button tied to a simple onClick event and then expand to an ajax call to a CS Element.
These customization steps are valid from version 11 R1 to the latest 11.1.1.8.0. To digress a bit, I recommend you try these examples on the latest WCS version 11.1.1.8.0. It has enhanced a couple UI issues plus it adds mobile support, vanity URLs, personalization preview and other great enhancements. It's a really exciting time to be working with WebCenter Sites but back to buttons.

When creating a toolbar button the first step is to set if custom buttons are available across all sites or tied to a specific site or asset type. The physical location of the UI’s dojo property file sets scope.
- [Global scope] Shared/elements/UI/Config/GlobalHtml.jsp.
- [Site wide scope] Shared/elements/CustomElements/<sitename>/UI/Config/SiteConfigHtml.jsp.
The property file is loaded once when the UI is rendered in the browser. The file defines the dojo controllers, UI events and general UI relationships. To simplify customization, the UI system loads any CS element stored in these directories beginning with the respective primary elements named GlobalHtml.jsp or SiteConfigHtml.jsp.
This opens the ability to abstracted custom configurations that will persist between patches and upgrades. Just remember that the primary configurations load first and later elements can add, overwrite or even remove settings. These configuration files are CS elements and may include code executed at load or within an event via ajax or simple java script.
In this first example, I’ll make this available to all sites by creating the CS element UI/Config/myExample.jsp. It should contain the following:
<%@ taglib prefix="cs" uri="futuretense_cs/ftcs1_0.tld"
%><%@ taglib prefix="ics" uri="futuretense_cs/ics.tld"
%><%--
elements/UI/Config/ToolbarExample.jsp
--%><cs:ftcs>
webcenter.sites['${param.namespace}'] = function (config) {
config.modules.baseURL = <%=ics.GetProperty("ft.cgipath", "futuretense.ini", true) %>;
config.toolbarButtons.myExample1 = {
alt: 'myExample1',
title: 'Example1',
src: 'js/fw/images/ui/ui/toolbarButton/smartlist.png',
onClick: function () {
var doc = SitesApp.getActiveDocument(); // current active document which holds the asset
var asset = doc.get('asset');
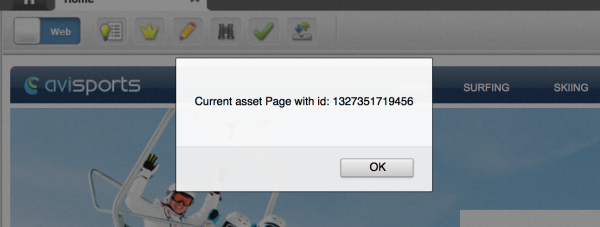
alert( asset.type + ' asset type and cid ' + asset.id);
}
};
// Tool bar buttons
config.toolbars.web.view = ["form-mode", "myExample1", "edit", "preview", "approve", "checkincheckout","separator", "refresh"];
config.toolbars.form.view = ["web-mode", "myExample1", "edit", "preview", "approve", "checkincheckout","separator", "refresh"];
}
</cs:ftcs>
In this example the onClick dojo event is used. It will retrieve the current dojo asset object and retrieve information on the asset. A simple alert is used to display the results.
onClick: function () {
var doc = SitesApp.getActiveDocument(); // current active document which holds the asset
var asset = doc.get('asset');
alert( asset.type + ' asset type and cid ' + asset.id);
}
The toolbar was also reformatted to include the myExample1 button on the far left. It should be noted that the refresh button has special properties to align to the right and should always be the last in the list.
config.toolbars.web.view = ["form-mode", "myExample1", "edit", "preview", "approve", "checkincheckout","separator", "refresh"];
config.toolbars.form.view = ["web-mode", "myExample1", "edit", "preview", "approve", "checkincheckout","separator", "refresh"];
The second example also uses the onClick method but makes an ajax request calling a site entry. In this example you will need to create both the target CS element and site entry such as CustomElements/Example/myExample2. The element doesn’t need to contain any logic. The element will be passed the assetType and asset id as both CS parameters and as a JSON object.
dojo.xhrGet({
url: config.modules.baseURL+"ContentServer?pagename=CustomElements/Example/myExample2&assettype="+type+"&assetid="+id, //url of the element
content:{"id":id,"type":type} //pass any parameters that need to be passed to the element
//handleAs:"json" // only if the element returns json resonse,if its html then this is not needed
})
The target code can run background tasks but has limited interaction with the UI as is. That will require a deeper dive into the custom controllers on the page.
I hope this opens up new ideas in your WCS endeavors!
The full second element from myExample2.jsp:
<%@ taglib prefix="cs" uri="futuretense_cs/ftcs1_0.tld"
%><%@ taglib prefix="ics" uri="futuretense_cs/ics.tld"
%><%--
elements/UI/Config/ToolbarExample.jsp
--%><cs:ftcs>
webcenter.sites['${param.namespace}'] = function (config) {
config.modules.baseURL = <%=ics.GetProperty("ft.cgipath", "futuretense.ini", true) %>;
// Button to call element
config.toolbarButtons.myExample2 = {
alt: 'Example2',
title: "Example2",
src: 'js/fw/images/ui/ui/toolbarButton/makemaster.png',
onClick: function () {
var doc = SitesApp.getActiveDocument(); // current active document
var asset = doc.get('asset');
var id = asset.get("id"); //asset id
var type = asset.get("type"); //asset type
// make an ajax call to call an element
dojo.xhrGet({
url: config.modules.baseURL+"ContentServer?pagename= CustomElements/Example/myExample2&assettype="+type+"&assetid="+id, //url of the element
content:{"id":id,"type":type} //pass any parameters that need to be passed to the element
//handleAs:"json" // only if the element returns json resonse,if its html then this is not needed
}).then(function(response) {
console.log("Sync response:", response);
// alert(response);
SitesApp.event(SitesApp.id("asset", type+":"+id), 'updateModel');
view = SitesApp.getActiveView(); // the active view
view.info(response);
},
function(err){
//handle error
console.log("error on ajax call");
});
}
};
config.toolbars.web.view = ["form-mode", "myExample2", "edit", "preview", "approve", "checkincheckout","separator", "refresh"];
config.toolbars.form.view = ["web-mode", "myExample2", "edit", "preview", "approve", "checkincheckout","separator", "refresh"];
}
</cs:ftcs>
- Log in to post comments
