Splunk App for Enterprise Security and PCI Compliance Correlation Search Drill-downs
Introduction
Welcome! In this post we'll talk about time ranges in correlation search drill-downs in two apps, the Splunk App for Enterprise Security (ES) and The Splunk App for PCI Compliance (PCI).
Correlation Searches and Drilling Down
Okay, so what exactly are we talking about regarding correlation searches and drilling-down? Correlation searches look for notable security events within your Splunk data. Notable security events are either a specific event that fires, such as an event from an Intrustion Prevention System, or patterns of events, such as multiple authentication attempts to a system. In the first case, the ES and PCI apps provide the actual event information that triggered the creation of the notable event. You can view this information when clicking on "View Details" for the event on the "Incident Review" page. What we want to focus on here is the second case, where the search is looking for a pattern of events and uses statistical commands on aggregate sets of data. From a security operations perspective, the notable event is the starting point for a security investigation. The apps provide a framework for customizing drill-down searches that can help in making the security investigation process more powerful and efficient.
What is the Problem?
When drilling-down from a notable event's details on the "Incident Review" page, the time range defaults to "All Time." While this can be helpful for many situations, sometimes the user performing the security investigation may just want to see the events from the time range of the correlation search instance which produced the notable security event. For example, if someone is investigating an event that was triggered by a search that ran 10 hours ago over the previous hour's data, how can they view the specific events that contributed to that notable event? A relative time range can't be added to the drill-down search, such as "earliest=-10h" because it's unknown when that person may be investigating the event. Time ranges can be manually set after drilling-down by looking at details such as when the notable event was triggered and what the time range of the correlation search is configured to (i.e. -20m to -5m). Although, this approach can work, it's cumbersome and not exact. Let' see if we can find a better way to solve this.
The Solution
The goal is to restrict the time range of the drill-down search to the exact time range of the correlation search that originally ran and triggered the event. To do this, the correlation search must be modified. As an example, we'll take a simple search that uses a statistical command to look at an aggregate set of data. In the real world, the correlation search would be a bit more complex, however the sample search follows a common pattern that correlation searches employ.
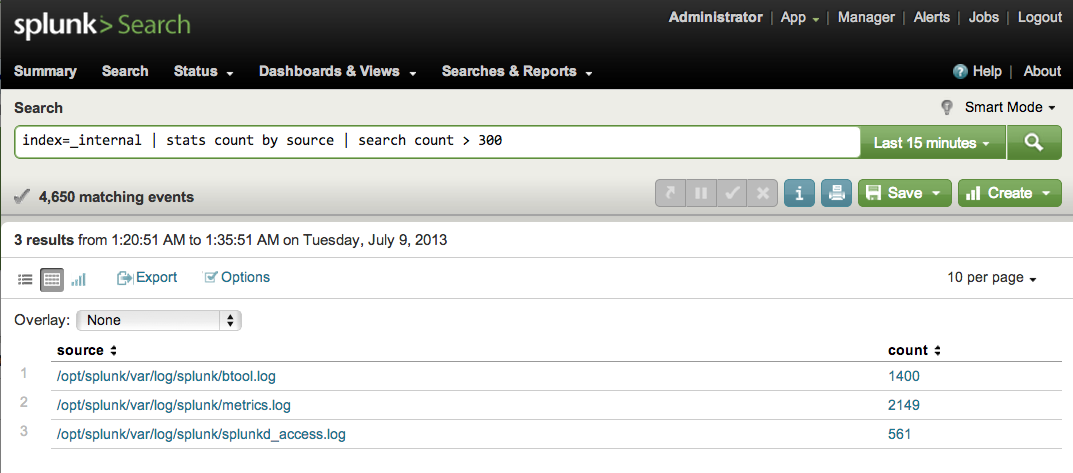
index=_internal | stats count by source | search count > 500
Results from Sample Correlation Search
Note that each row in the result set will generate a notable event in the app. The columns shown in the table are important. These are the fields that are available to pass to the drill-down search. The key part now is to append the "addinfo" command at the end of the search in order to add information related to the execution of the search.
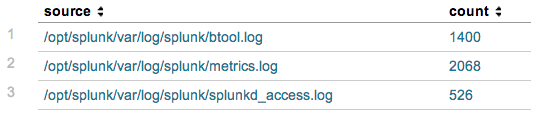
index=_internal | stats count by source | search count > 500 | addinfo

Sample Correlation Search with "addinfo" Command
As you can see above, several fields were added to the table. These fields contain metadata related to the search that was executed. We're especially interested in the "info_min_time" and "info_max_time" fields. These contain the lower bound and the upper bound of the search's time range, respectively. Now our correlation search contains the information we need to set the time range for our drill-down search. Note in the first row, the number of events returned was 2,063. This should be the same number that our drill-down search returns.
Drill-down searches in the ES and PCI apps can use tokens, just as when creating dashboards in Splunk's XML syntax. Remember that each row in the resultset from the correlation search will be a notable event, therefore we'll construct our drill-down search to only select data for one of the rows. Since the result set of the correlation search was grouped by source, we can filter the events by that field.
index=_internal source=$source$ earliest=$info_min_time$ latest=$info_max_time$
Of course this won't run in the search bar as written since it contains the tokens in the search syntax. However, to test this we can use literal values from the first row in the correlation search's result set and see how many events are returned:
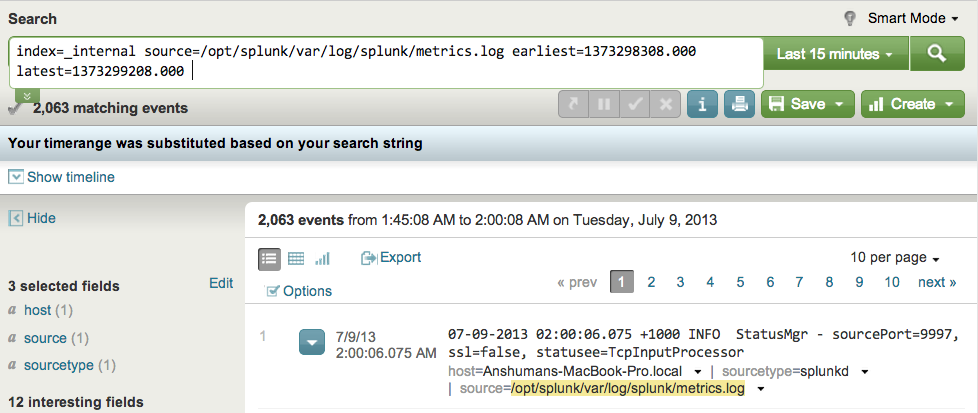
Testing Drill-down Search
As you can see the same number of events (2,063) was returned as in the first row in the result set of the correlation search!
Summary
In conclusion, the "addinfo" command can be used to add search execution metadata fields to a result set. In the case of correlation searches in the ES and PCI Apps, these fields can be used to limit the time range of the corresponding drill-down search.
Cheers!
Image courtesy of twobee / FreeDigitalPhotos.net
- Log in to post comments
