Create a Simple 'Contact Us' Form with GSF
If you're familiar with the GSF, then you already know how helpful it is for developing basic JSP Templates and how it lets you do the same work as before, except with a lot fewer lines of code. But what about another type of page that most sites need? I am, of course, talking about the Contact Us form page. The GSF 11.x makes it easy to add your own custom form processing logic without having to write your own Java controller from scratch. In a few easy steps, your Contact Us form page can be up and running in no time!
STEP 1: CREATE THE FORM TEMPLATE
First, let's create a Template to render our Web-Referenceable Asset (WRA) and the Contact Us form.
<%@ taglib prefix="cs" uri="futuretense_cs/ftcs1_0.tld"
%><%@ taglib prefix="ics" uri="futuretense_cs/ics.tld"
%><%@ taglib prefix="render" uri="futuretense_cs/render.tld"
%><%@ taglib prefix="satellite" uri="futuretense_cs/satellite.tld"
%><%@ taglib uri="http://java.sun.com/jsp/jstl/core" prefix="c"
%><%@ taglib uri="http://gst.fatwire.com/foundation/tags/gsf" prefix="gsf"
%><%@ page import="COM.FutureTense.Interfaces.*,
 COM.FutureTense.Util.ftMessage,
 COM.FutureTense.Util.ftErrors"
%><cs:ftcs><gsf:root>
<html>
<head>
<title>${asset.metatitle}</title>
<meta name="description" content="${asset.metadescription}" />
<meta name="keyword" content="${asset.metakeyword}" />
</head>
<body>
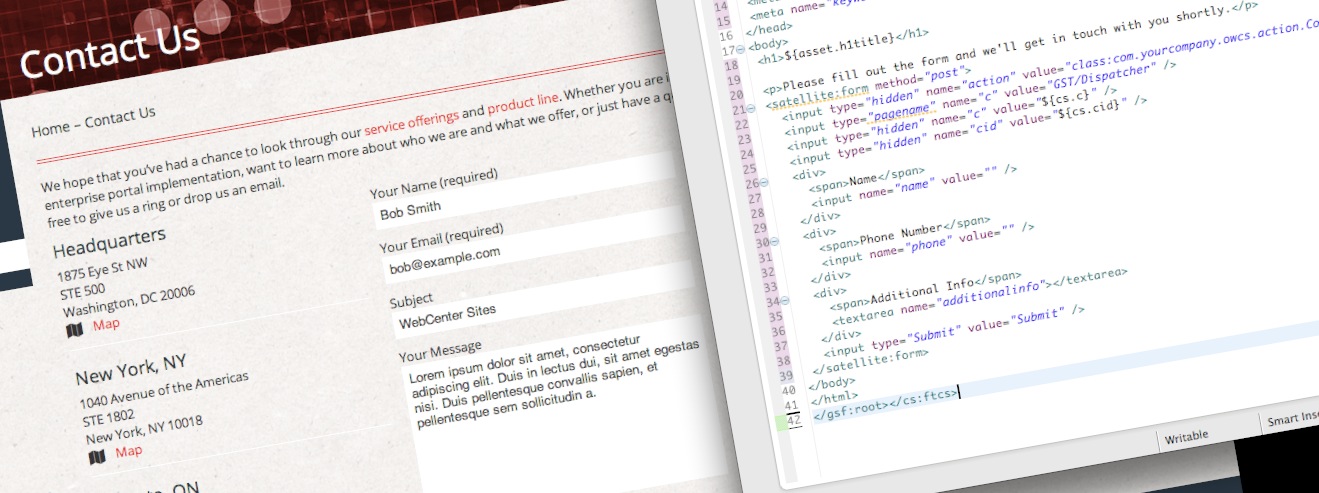
<h1>${asset.h1title}</h1>
<p>Please fill out the form and we'll get in touch with you shortly.</p>
<satellite:form method="post">
<input type="hidden" name="action" value="class:com.yourcompany.owcs.action.ContactUsForm" />
<input type="pagename" name="c" value="GST/Dispatcher" />
<input type="hidden" name="c" value="${cs.c}" />
<input type="hidden" name="cid" value="${cs.cid}" />
<div>
<span>Name</span>
<input name="name" value="" />
</div>
<div>
<span>Phone Number</span>
<input name="phone" value="" />
</div>
<div>
<span>Additional Info</span>
<textarea name="additionalinfo"></textarea>
</div>
<input type="Submit" value="Submit" />
</satellite:form>
</body>
</html></gsf:root></cs:ftcs>
In the JSP header, we've imported the "gsf" tag library and one of the JSTL taglibs ("c"). Next, immediately inside the <cs:ftcs> template we have the <gsf:root> tag. This will take care of loading the current asset for us (as defined by ICS variables "c" and "cid") and it will log the dependencies for us (that <render:logdep ... /> tag that you always see at the beginning of JSPs).
Next, we'll display a few attributes from the WRA, such as ${asset.h1title}, then display the form using <satellite:form>. Inside the form, put any form inputs you need, and then be sure to include these four lines:
<input type="hidden" name="action" value="class:com.yourcompany.owcs.action.ContactUsForm" />
<input type="hidden" name="pagename" value="GST/Dispatcher" />
<input type="hidden" name="c" value="${cs.c}" />
<input type="hidden" name="cid" value="${cs.cid}" />
The first two lines, inputs 'action' and 'pagename', will submit the form directly to the GSF Action that does the form processing. And the other two lines are the c/cid of the current WRA (so we can render the form's confirmation page).
STEP 2: BUILD THE GSF ACTION
To do the form processing part of the Contact Us page, we're going to create our own GSF Action class (an implementation of GSF's 'Action' interface actually), compile it into our own Jar file file (as part of a Maven project), and deploy it to WebCenter Sites. In order to do this, you'll need to download and build the GSF in your local environment.
First, in the pom.xml file, add this dependency (check to make sure which version of GSF you have):
<dependency>
  <groupId>com.fatwire.gst</groupId>
  <artifactId>gst-foundation-all</artifactId>
  <version>11.6.0-RC2-SNAPSHOT</version>
</dependency>
Adding this one dependency will let you use all of the GSF classes, as well as the native WebCenter Sites classes. Next, create the ContactUsForm GSF Action:
package com.yourcompany.owcs.action;
import COM.FutureTense.Interfaces.ICS;
import com.fatwire.gst.foundation.controller.action.RenderPage;
import com.fatwire.gst.foundation.controller.annotation.InjectForRequest;
/**
 * Processes the Contact Us form page by sending an email and dispatching back to the Template.
 * @author David Chesebro
 * @since 2013-02-11
 */
public class SampleContactUsForm extends RenderPage {
  /**
  * Inject an ICS into the action for convenience
  */
  @InjectForRequest
  public ICS ics;

  @Override
  public void handleRequest(ICS ics) {
    // process the form
    doProcessForm(ics);
    // call RenderPage's handleRequest method to load the current Page and dispatch back to the Template
    super.handleRequest(ics);
  }
/**
* Process the form by sending an email with the submitted info.
* @param ics
*/
private void doProcessForm(ICS ics) {
// load the 'Contact Us' form fields
String name = ics.GetVar("name");
String phone = ics.GetVar("phone");
String additionalinfo = ics.GetVar("additionalinfo"); // Format and send an email containing the submitted info
//...
//...
boolean emailSent = ics.SendMail(to, subject, body);
// let the Contact Us Template know that the form was just submitted
if(emailSent)
ics.SetVar("formProcessed", "true");
else
ics.SetVar("formProcessed", "error");
}
}First the class declaration -- by extending the RenderPage class, this allows us to perform our own custom logic, then once we're done, just call super.handleRequest(ics) to do the default logic of dispatching to the current WRA's Template. Next, we add an ICS object to the class. This uses annotation-based injection to instatiate it for us, which is possible because we are extending the RenderPage class (which implements the 'Action' GSF interface). The ICS object will let us retrieve the form inputs as well as do any additional form processing (which in this case is just sending an email). And finally the handleRequest(ICS ics) function. This is what gets called when the GSF Action is run. This calls our form processing logic (doProcessForm(ics)), calls super.handleRequest(ics) to let RenderPage dispatch to the current WRA's template. In doProcessForm(ics), we simply load the form inputs (using ics.GetVar()), and then send an email using ics.SendMail(). Once we've sent the email, we set the ICS variable formProcessed to either "true" or "error" to let the Template know that we just submitted the form.
Once the ContactUsForm class is complete, build your jar and deploy it to your application server.
STEP 3: UPDATE FORM TEMPLATE WITH A CONFIRMATION MESSAGE
And finally, we'll update the Template from Step #1 to display either a confirmation message or the contact us form, depending on whether the visitor just submitted the form or is visiting the page for the first time. We'll add the following code around our original <satellite:form> tag from earlier:
<%-- check the 'formProcessed' ICS variable to see if the form was just submitted --%>
<c:choose>
  <c:when test="${cs.formProcessed == 'true'}">
    <p>Thank you for contacting us. We'll be in touch soon.</p>
  </c:when>
  <c:when test="${cs.formProcessed == 'error'}">
    <p>There was a problem processing your request. Please try again later</p>
  </c:when>
  <c:otherwise>
    <p>Please fill out the form and we'll get in touch with you shortly.</p>
    <satellite:form method="post">
    ...
    </satellite:form>
  </c:otherwise>
</c:choose>
So this code says: If 'cs.formProcessed' (the equivalent of ics.GetVar("formProcessed"), which is the variable we set in the ContactUsForm Action class) equals "true", then display a 'thank you' confirmation message. If 'cs.formProcessed' equals "error", let the visitor know there was a problem processing the form. Otherwise, assume this is the visitor's first time visiting the Contact Us page and display the form.
Now your Contact Us form is complete. Happy coding!
- Log in to post comments

Comments
Anu on May 15, 2013
David on May 15, 2013